.png?width=140&height=37&name=BLAZE-Logo-Blue%20(2).png)
Before adding new products, categories/industry types, and tax groups must be added.
Click [Add Link Here] to learn how to add categories
Click [Add Link Here] to learn how to add tax groups (Settings - Taxes section)
Click [Add Link Here] to learn how to use our new v2 Tax Configurations
Click [Add Link Here] to learn how to add Vendors and Brands
Choose between a Standalone Product or a Variant Product (items with multiple sizes or colours). Note: For best performance and cleaner catalogue management, standalone products are strongly preferred.
[Add Image Here]
Adding Products
-
Navigate to your BLAZE Dashboard > Products > Product List
-
Click the Add Product button in the top right corner of the screen.
-
Choose whether you would like to create a standalone product or a product with variants (see below for a more detailed description).
Manually enter product data
-
Enter the product's basic information
-
Configure your product's inventory settings to your needs
-
Fill in the remaining product detail information
Product Overview - Main Sections
There are three (3) main sections to focus on when adding and/or editing product information.
-
Basic Information
-
Inventory Settings
-
Variants/Product Details
Basic Information
The Basic Information section contains important information such as a name, compliance category, and taxes for this specific product or product folder.
[Add Image Here]
-
Active/Inactive: Toggle on or off to make products active in your product list. Inactive products will not show up on the POS.
-
Parent SKU: Only used by WooCommerce integration. This will only be visible when the "Variant" inventory setting is selected.
-
SKU: A SKU (Stock Keeping Unit) is a unique identification code for your products.
-
Name: Required to identify the product easily.
-
Category: All products should be categorized into the appropriate product category or subcategory so that compliance reports are accurate.
-
Brand: Products should be assigned to the correct brand for reporting purposes.
-
Taxes: The taxes charged to the customer when processing a sales order.
-
Description: Customer-facing description of your product.
Finally, in the Basic Information section, upload a picture of your product so sales staff can easily identify the product on the POS device. Underneath the photo, warnings will be displayed if you have missed important information.-2.png?width=269&height=518&name=image%20(9)-2.png)
Inventory Settings
The inventory settings ensure products are organized and tracked with the POS system.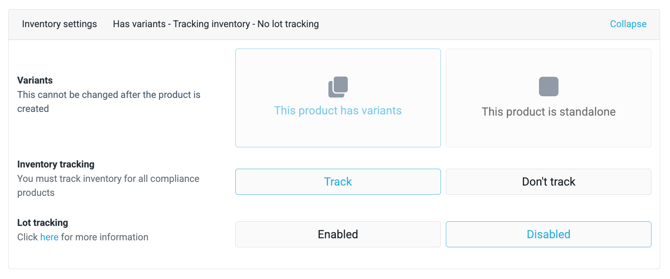
-
Variants: Variants are used to organize your products into a product folder. This is useful for grouping products with different variations in one place.
Example: If you have 3 different products of [Brand 1] with different variations Eg. Brand 1 250mL, Brand 1 500 mL ,etc they can be saved as variants under the parent product Brand 1 -
Standalone: Creates one line in the product list. These products do not live in a folder nor do they have variants.
-
Inventory Tracking: By default, inventory tracking is turned on for all products. This allows you to track physical inventory movements and add inventory quantities via purchase order.
-
Lot Tracking: A lot is a batch of products made or collected together into a distinct group identified by a shared lot number. These provide value where a product is recalled.
Variants/Product Details
Depending on your selection of "This product has variants" or "This product is standalone" will determine what information you see on the product details page.
-
Inactive/Active Variants: Each variant can be set to active or inactive. Note: If your store has more than one location, setting this variant to inactive/active will apply to all locations.
For example, perhaps you no longer sell a version of a product, and you do not want it to show up on the POS; you can simply change the variant to inactive.
[Add Image Here]
Pricing
-
Retail Price: The price that this product will be sold to customers.
-
Wholesale cost: The cost at which this product was purchased from your [Vendor Name].
-
Margin/Markup: Set your desired margin or markup, and the retail price will automatically populate.
-
Add deposit fee: Add a non-taxed bottle deposit fee typically used for beverages.
Multi-location pricing: BLAZE supports different retail pricing for your different locations. Once a location is selected and a retail price is set, the location drop-down menu will lock that location in place.
Discounts
-
Allows the user to select which discounts apply to this product. Choose from the list and select the location the discount applies to. For more information on creating and managing discounts, click here [Add Link Here]
Barcode
-
Barcode: Allows BLAZE to identify the products you are scanning. You can enter one manually or have BLAZE generate one for you.
Descriptions
-
Receipt description: Prints on all receipts if this specific product is sold.
-
Description: Product description viewable on the POS.
Details
-
Product weight: The equivalent weight is used to calculate federal carry limits if applicable. If unknown,
-
Net product weight: The weight used to calculate weights in compliance reports for certain territories
-
Product volume: The net volume of the product is usually provided on the product package.
-
==Strain type==: Select between one of: ==Sativa==, ==Sativa Dominant==, ==Indica==, ==Indica Dominant==, ==Hybrid==, potency-balanced. This field can be accessed by integration partners.
Potency
-
Potency: Potency values of products can be a single value or a range. To set potency values, first add a Category to the prodry or set an Industry Type on the assigned category . For more information on setting your Categories click here [Add Link Here]
-
Units: Local compliance bodies and vendors may be required to use mg/g and mg/mL to report potency on the packaging. Most products' potency will be reported in mg/g or mg/ml.
-
Multi-location Potency: BLAZE supports different potency values for your different locations. Select the "+ Add potency profile" button under the potency tab.
Tags
-
Tags can be used for alternative categorization and add functionality to BLAZE ECOM.
Custom Fields
-
API users can put custom fields on products that can be understood by integrations.
Inventory
The inventory tab gives you a breakdown of each location's current inventory on hand. You can:
-
Add, remove, or set specific inventory quantity values
-
See lot number inventory breakdowns
-
Set low stock and restock quantities
-
View visual diagrams of inventory movements
Editing Products
-
Navigate to your BLAZE Dashboard > Products > Product List
-
Click the product name within the product list to be redirected to the product edit page.
For any issues, please contact the BLAZE Support Team using the chat function on your Dashboard.