---
title: Dashboard | Dashboard Settings
description: Learn how to configure your store's General settings in BLAZE to customize operational preferences, location details, and system defaults.
---
[Skip to content](https://support.blaze.me/articles/settings-general#main-content)
[.png?width=140&height=37&name=BLAZE-Logo-Blue%20(2).png)](https://support.blazepos.com/?hsLang=en)
- [BLAZE Apps Knowledge Base](https://support.blazepos.com/)
Open main navigation
Close main navigation
- [BLAZE Apps Knowledge Base](https://support.blazepos.com/)
Questions? Find helpful articles by searching here...
- There are no suggestions because the search field is empty.
1. [R-Suite Knowledge Base](https://support.blaze.me/articles?hsLang=en)
2. [Dashboard](https://support.blaze.me/articles/dashboard?hsLang=en)
3. [Settings](https://support.blaze.me/articles/dashboard?hsLang=en#settings)
# Dashboard | Dashboard Settings
## This article provides a breakdown of all the dashboard settings. Here you can customize your locations, POS devices, receipts, tax groups, inventory auditing, and set up gift cards.
### Settings - General
**Company logo**: Upload your logo which will show on your POS device(s) when you start a shift. This is completely optional, but many stores enjoy branding their systems.
**Company name**: Will show at the top of your sales receipts.
**Province**: Will determine which compliance report is generated, and which provincial product database you have access to. This is very important because compliance reports are generated differently for every province.
**GST number**: This Will show up at the bottom of your receipts. This ensures that the sale was legally tendered.
**Onboarding mode**: First-time users have this setting enabled. Disabling it will change what information is displayed on your Dashboard homepage.
### Settings - Locations
Locations represent unique inventory storage locations in BLAZE. These can be physical and/or virtual locations.
If you expand each location, you can enter:
- Location Name
- License ID
- Street Address
- Province/State
- City
- Postal Code/Zip Code
- Time zone
When you set up a store, you have 2 options. If you are creating a new location or storefront, please contact our Sales team at [sales-ca@blaze.me](mailto:sales-ca@blaze.me) for billing purposes.
1. **(Most common)** 1 inventory location for 1 store. This keeps your inventory management very simple and easy to train for.
2. **(Less common)** 2 inventory locations for 1 store. This allows you to have a front/back separation, but due to the overhead of adding transfers whenever inventory moves back and forth, this is only suitable for large stores with lots of inventory management staff.
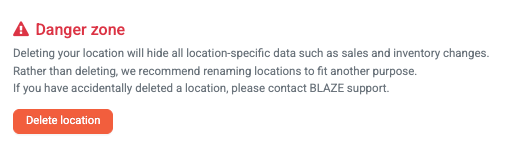
When you delete a location, it will prevent any associated data (sales, inventory, etc.) from being accessed. Please contact Customer Support to assist prior to deleting locations.
[](https://support.blaze.me/hubfs/Knowledge%20Base%20Import/74140832-87f6-46cd-97ca-c3f806c985d5-4-1.png?hsLang=en)
### Settings - POS
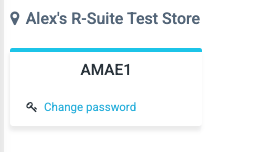
The POS section displays all the POS devices that are attached to your account by location. Typically, each of your cash registers or till stations will be assigned to a specific iPad device. Each iPad needs to be assigned to a POS device ID and has a unique password. You can change the password for each of the devices and set up payment integrations.
POS devices can only be added by the BLAZE support staff. If you need additional devices, please contact us
[](https://support.blaze.me/hubfs/Knowledge%20Base%20Import/image-Jul-25-2023-05-30-38-5173-AM-1.png?hsLang=en)
### Settings - Receipts
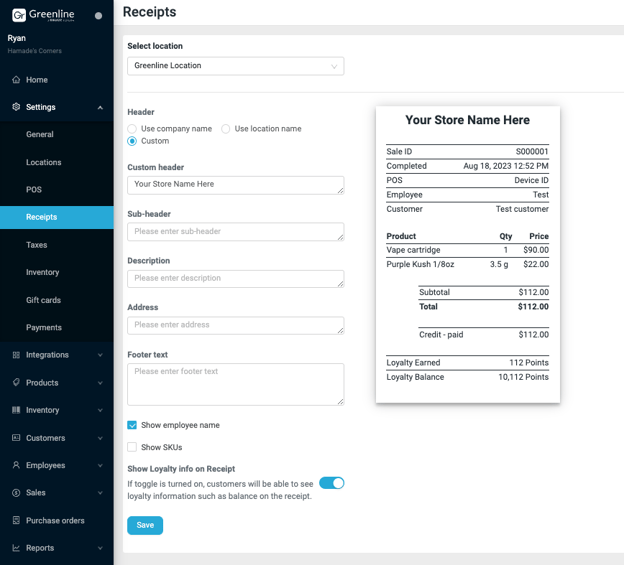
This section provides a preview of your store's sales receipts. Here you may customize your receipt headers, footers, description, etc.
"Use company name" is the default selection for receipt headers. Particularly useful for single location dashboards. An example of the company name is found beneath the employee name in the top left corner of the dashboard.
"Use location name" will set the receipt header to display the name input to the location card under Settings \> Locations. This will be helpful for multi-location dashboards.
"Custom" will allow for any input, regardless of company or location names set to the dashboard.
In the footer, you can include information such as refund or return policies. You can also include the employee name and/or SKU numbers on the receipt by selecting either of the check boxes.
Stores using Greenline's Loyalty program may display a customer's balance by toggling "Show loyalty info on Receipt"
[](https://support.blaze.me/hubfs/Knowledge%20Base%20Import/image-Jul-25-2023-05-30-35-6090-AM-1.png?hsLang=en)
### Settings - Taxes
Tax groups consist of multiple taxes. They should be pre-created as part of your account setup, but please double-check them before you start adding products.
Taxes are applied on a per-product basis, so it's important to make sure all taxable products are attached to the right group.
BLAZE recommends using the new Tax Configurations method. as opposed to traditional tax groups for easier product creation. For more info on [Tax Configurations, click here.](https://support.blaze.me/articles/dashboard-tax-configurations?hsLang=en)
If Tax Configurations for a product fail, the system will fall back to using tax groups.
### Settings - Inventory
**Audit counting mode - Regular**: When doing audits under Dashboard \> Inventory \> Audits, the user will see the expected quantities per product.
**Audit counting mode - Blind**: When doing audits under Dashboard \> Inventory \> Audits, the user will not see expected quantities per product.
**Audit completing mode - Relative**: When you count inventory, the difference will be applied against your inventory from when you started the audit. This is good for stores that perform inventory counts during customer business hours.
**Audit completing mode - Replace**: When you count inventory, the final count will be applied against your inventory from when you started the audit. This is good for stores that want to keep counting simple and outside of customer business hours.
**Inventory cost calculation**: BLAZE provides 2 ways of tracking costs for your products: "weighted average" and "last cost". For more information, please visit [this article](https://support.blaze.me/articles/last-cost-default?hsLang=en).
**Parked sale barcode validation**: Adds an additional level of inventory selection accuracy for pending/online sales orders.
[Learn more about Barcode Validation here](https://support.blaze.me/articles/draft-revision-dashboard-order-hub-barcode-validation?hsLang=en)
**Block negative inventory sales:** When a sale is made that would result in negative inventory quantities, a warning will appear on the POS system prior to processing the sale. A manager will be required to override the sale into a negative inventory quantity.
**Automatic restock for refunded cannabis products:** When enabled, refunded cannabis products will automatically be restocked in the inventory. For more information, review the article [Altering Sales under the FAQs section.](https://support.blazepos.com/faqs-2?hsLang=en)
Optimizing your General settings ensures your daily workflows, receipts, and system defaults align perfectly with your business operations. Take a moment to review your configurations today to keep your store running smoothly.
- [Getting started](https://support.blaze.me/articles/getting-started?hsLang=en)
- [Dashboard](https://support.blaze.me/articles/dashboard?hsLang=en#main-content)
- [General](https://support.blaze.me/articles/dashboard?hsLang=en#general)
- [Settings](https://support.blaze.me/articles/dashboard?hsLang=en#settings)
- [Employees](https://support.blaze.me/articles/dashboard?hsLang=en#employees)
- [Customers](https://support.blaze.me/articles/dashboard?hsLang=en#customers)
- [Products](https://support.blaze.me/articles/dashboard?hsLang=en#products)
- [Inventory](https://support.blaze.me/articles/dashboard?hsLang=en#inventory)
- [Sales](https://support.blaze.me/articles/dashboard?hsLang=en#sales)
- [Purchase Orders](https://support.blaze.me/articles/dashboard?hsLang=en#purchase-orders)
- [Discounts](https://support.blaze.me/articles/dashboard?hsLang=en#discounts)
- [Reports](https://support.blaze.me/articles/dashboard?hsLang=en#reports)
- [POS (Tablet)](https://support.blaze.me/articles/pos-tablet?hsLang=en#main-content)
- [Getting Started](https://support.blaze.me/articles/pos-tablet?hsLang=en#getting-started)
- [General](https://support.blaze.me/articles/pos-tablet?hsLang=en#general)
- [POS Register](https://support.blaze.me/articles/pos-tablet?hsLang=en#pos-register)
- [Starting and Ending Shifts](https://support.blaze.me/articles/pos-tablet?hsLang=en#starting-and-ending-shifts)
- [POS (Browser)](https://support.blaze.me/articles/pos-browser?hsLang=en#main-content)
- [Starting and Ending Shifts](https://support.blaze.me/articles/pos-browser?hsLang=en#starting-and-ending-shifts)
- [General](https://support.blaze.me/articles/pos-browser?hsLang=en#general)
- [POS Register](https://support.blaze.me/articles/pos-browser?hsLang=en#pos-register)
- [BLAZE ECOM](https://support.blaze.me/articles/blaze-ecom?hsLang=en#main-content)
- [Customization](https://support.blaze.me/articles/blaze-ecom?hsLang=en#customization)
- [ECOM Discounts](https://support.blaze.me/articles/blaze-ecom?hsLang=en#ecom-discounts)
- [SEO](https://support.blaze.me/articles/blaze-ecom?hsLang=en#seo)
- [General](https://support.blaze.me/articles/blaze-ecom?hsLang=en#general)
- [ECOM Set-up](https://support.blaze.me/articles/blaze-ecom?hsLang=en#ecom-set-up)
- [BLAZEPAY](https://support.blaze.me/articles/blazepay?hsLang=en#main-content)
- [Getting Started](https://support.blaze.me/articles/blazepay?hsLang=en#getting-started)
- [General](https://support.blaze.me/articles/blazepay?hsLang=en#general)
- [BLAZEPAY Merchant Portal](https://support.blaze.me/articles/blazepay?hsLang=en#blazepay-merchant-portal)
- [Hardware](https://support.blaze.me/articles/hardware?hsLang=en#main-content)
- [General](https://support.blaze.me/articles/hardware?hsLang=en#general)
- [Printers](https://support.blaze.me/articles/hardware?hsLang=en#printers)
- [Payments](https://support.blaze.me/articles/hardware?hsLang=en#payments)
- [Scanners](https://support.blaze.me/articles/hardware?hsLang=en#scanners)
- [BLAZE Sites](https://support.blaze.me/articles/blaze-sites?hsLang=en#main-content)
- [General](https://support.blaze.me/articles/blaze-sites?hsLang=en#general)
- [Customization](https://support.blaze.me/articles/blaze-sites?hsLang=en#customization)
- [Widgets](https://support.blaze.me/articles/blaze-sites?hsLang=en#widgets)
- [SEO](https://support.blaze.me/articles/blaze-sites?hsLang=en#seo)
[.png?width=140&height=37&name=BLAZE-Logo-Blue%20(2).png "BLAZE-Logo-Blue (2)")](http://blaze.me)
BLAZE Apps Knowledge Base
Copyright © 2026, BLAZE Solutions Inc.