
| Product Connector | Server URL | Authentication Method/OAuth Client ID | Registration Method | Token Endpoint Auth |
| BLAZE Retail | https://retail-mcp.blaze.me/retail/mcp | discovery-retail-mcp | User-Defined OAuth Client | none |
| BLAZE Ecom | https://ecom-mcp.blaze.me/ecom-admin/mcp | OAuth/Automatic | User-Defined OAuth Client | none |
| BLAZE Growth | https://growth-mcp.blaze.me/mcp | OAuth/Automatic | User-Defined OAuth Client | none |
Chat GPT Prerequisites
Before you begin, ensure you have the following:
- An active BLAZE account with MCP access enabled by an account admin.
- A web-based ChatGPT account with access to Plugins in the sidebar.
- The specific MCP URL and OAuth Client ID for the connector you are integrating.
NOTE: BLAZE Retail, BLAZE Ecom, and BLAZE Growth are separate MCPs. If you use multiple connectors, perform the configuration steps once for each connector. Contact your BLAZE representative or BLAZE support if you need your MCP URLs or OAuth Client IDs.
How to Add BLAZE MCP to ChatGPT
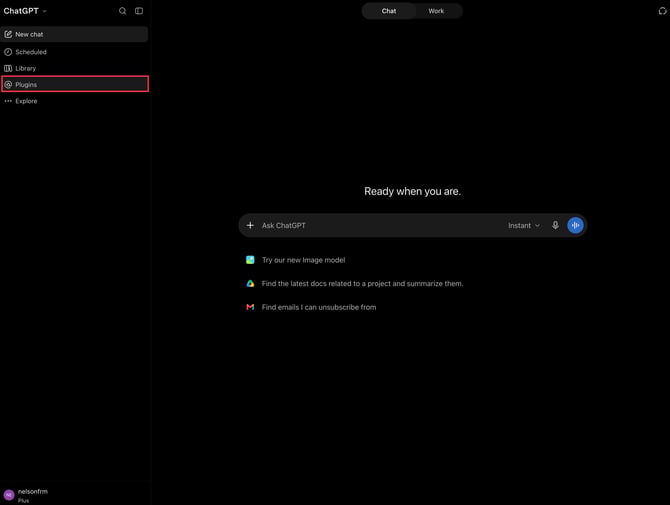
- In the ChatGPT web sidebar, click Plugins.
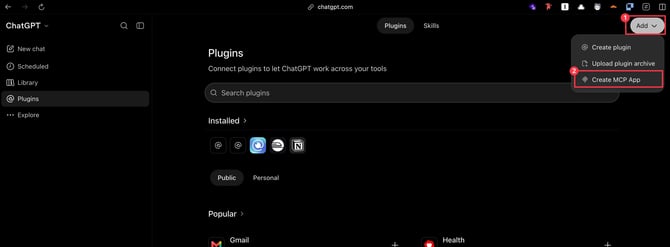
- On the Plugins page, click Add, then select Create MCP App.
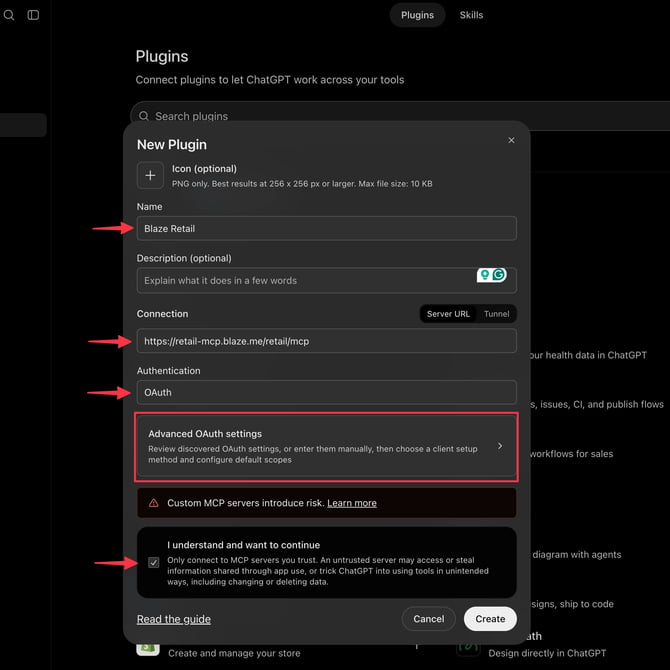
- In the Create MCP App window, complete the following fields:
| Field | What to Enter |
| Name | Blaze Retail |
| Connection | https://retail-mcp.blaze.me/retail/mcp |
| Authentication | Select OAuth |
- Check the I understand and want to continue checkbox.
- Click Advanced OAuth settings to expand additional configuration fields:
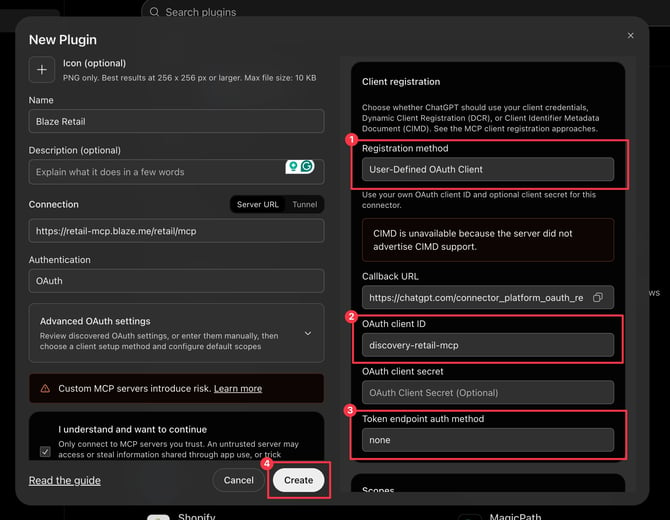
- Under Advanced OAuth settings, fill in these fields:
| Field | What to Enter |
| Registration method | Select User-Defined OAuth Client |
| OAuth client ID | discovery-retail-mcp |
| Token endpoint auth method | Select none |
- Click Create.
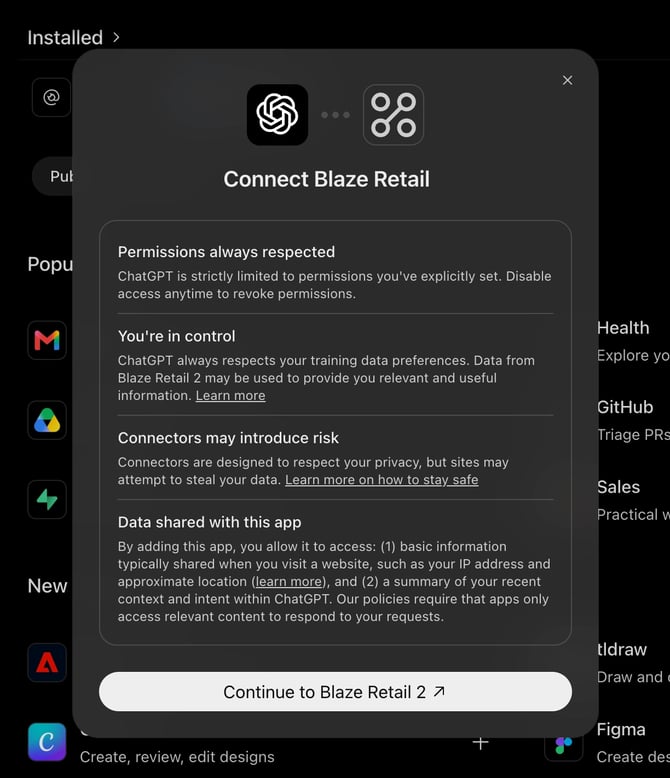
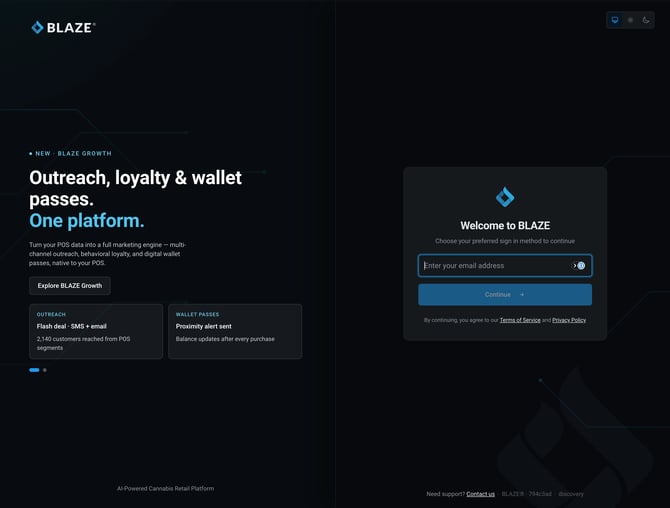
- When prompted to continue with BLAZE, proceed to the sign-in screen and enter your BLAZE login credentials.
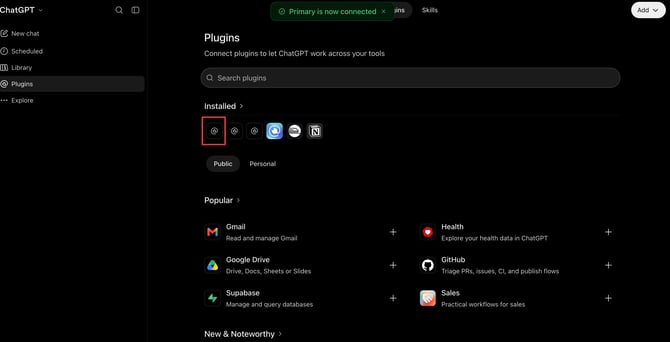
- After authenticating, navigate back to the ChatGPT Plugins page and verify that the connector appears under Install MCP.
- Look for the new MCP in the Install MCP section of the Plugins page. If it's listed, the setup is complete.
Using BLAZE MCP in ChatGPT
To interact with BLAZE in any ChatGPT conversation, type @ followed by the connector name (e.g., @Blaze Retail) and enter your request or question in natural language.
WARNING: Any action that creates, updates, or deletes data will prompt you for confirmation first before applying changes directly to your live BLAZE account (unless custom permissions have been modified within your ChatGPT settings).
NOTE: ChatGPT enforces user-level BLAZE permissions. The AI assistant can only access the store locations and data permitted by your BLAZE user login.
Security and Best Practices
- Maintain Individual Credentials: Never share BLAZE or Mission Control logins. All changes made by an AI assistant are attributed to the logged-in user account.
- Verify Store Targets: Check the store name in the approval confirmation prompt before selecting Allow.
- Audit Prior Settings: Query the current configuration before initiating changes so settings can be reverted if needed.
- Do Not Disable Approvals: Keep confirmation prompts enabled for all create, update, or delete operations.
- Incremental Testing: Test multi-store changes on a single store location first to verify results before batch updating.
- Back Up Before Deleting: Clearing delivery maps removes active delivery zones immediately. Deleted promotional banners and holiday hours cannot be restored automatically.
- Review Multi-Store Scope: Certain deal and page configurations apply globally across all stores in an organization group.
- Verify Execution: Ask the AI assistant to read back updated settings or inspect the live menu directly to verify changes.
- Read-Only Access: If you only require analytical reporting, connect using a view-only login or disable modification tools in your connector configuration.
- Data Privacy: AI chat responses may display internal store configurations and key data. Avoid pasting raw chat outputs into public channels.
Disabling MCP Access
To disable MCP functionality across all connected AI assistants for your entire account:
- Log into BLAZE as an Account Admin or Owner.
- Navigate to Settings > Products.
- Toggle off the MCP add-on.
WARNING: Disabling the MCP add-on immediately revokes API access for all connected AI assistants across the entire account.
Troubleshooting
- "MCP isn't enabled" Error: Verify with your Account Admin that the MCP add-on is active in Settings > Products.
- Missing Stores or Data: The AI assistant enforces user-level permissions. Ensure your BLAZE user role has access to the missing store locations, then disconnect and reconnect the connector.
- Assistant Is Not Responding via BLAZE: Ensure the BLAZE connector is toggled ON for your active chat session. In ChatGPT, type
@and explicitly selectBLAZE Ecom. - "Add custom connector" Option Grayed Out (Claude): Contact your Claude workspace admin to enable custom connectors or add the server globally.
- "Add custom MCP server" Missing (ChatGPT): Confirm Developer mode is enabled on your ChatGPT account. For Enterprise accounts, contact your workspace administrator.
- Changes Do Not Save: Settings controlled directly by your POS or main BLAZE core settings cannot be updated via ECOM MCP. Make these edits directly within Mission Control or BLAZE POS.
- Authentication or Sign-In Errors: Disconnect the connector in your AI app settings and perform the authorization process again.
- Product Missing from Menu: Query the assistant directly: "Why isn't [Product Name] showing on my menu?" to identify stock, visibility, or channel restrictions.
Claude
Prerequisites
- An active BLAZE account with the MCP add-on enabled by an Account Admin or Owner via Settings > Products.
- A supported BLAZE plan (Standard or Professional).
- Active BLAZE Retail credentials for the stores you manage.
- An AI platform that supports custom MCP connectors (Claude Web/Desktop, ChatGPT, etc.).
NOTE: Turning on MCP enables access account-wide. However, user permissions strictly apply—each user's AI assistant can only access the store locations and operational data permitted by their specific BLAZE login.
What to Expect
- Quick Setup: Setup takes about 5 minutes. Add the custom connector and sign in using your BLAZE credentials.
- Strict Permission Enforcement: Your AI assistant only sees what your user login can access. No new data or stores are unlocked beyond your existing BLAZE user permissions.
- Approval Required for Changes: Your AI app asks for explicit confirmation before performing any action that creates, edits, or deletes settings.
Server URLs and OAuth Client Configuration
Use the following server URLs and OAuth Client IDs when configuring your AI assistant connectors:
| Product | Server URL | OAuth Client ID |
|
BLAZE Retail |
https://retail-mcp.blaze.me/retail/mcp |
discovery-retail-mcp |
How to Add a Custom MCP Connector to Claude
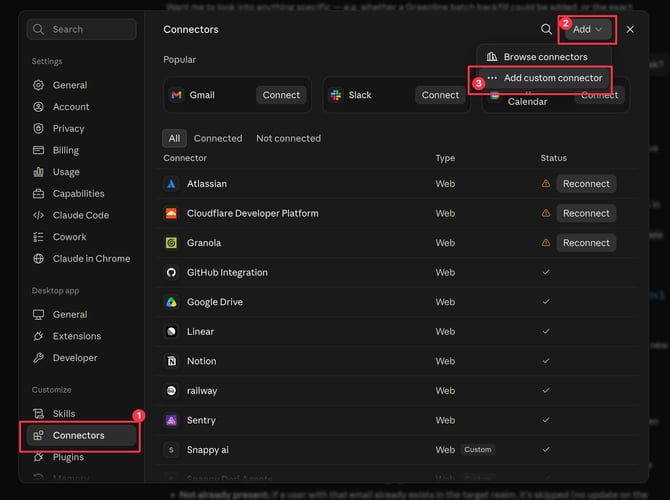
- In the Claude sidebar, click Customize.
- In the modal that appears, navigate to Connectors > Add > Add custom connector.
-
Fill out the connector details:
- Name: Enter a name (e.g.,
BLAZE Retail). - MCP Server URL: Paste the appropriate Server URL from the configuration table above.
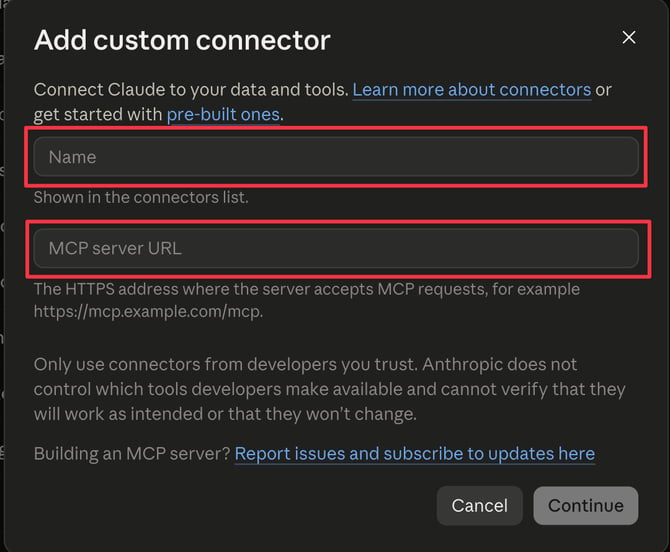
- Name: Enter a name (e.g.,
- Save the connector configuration by clicking "Continue"
-
Add Custom Connector
- Under Authentication, select Sign in now.
- Under OAuth client, select Use your own OAuth client.
- Enter the corresponding OAuth Client ID from the table above.
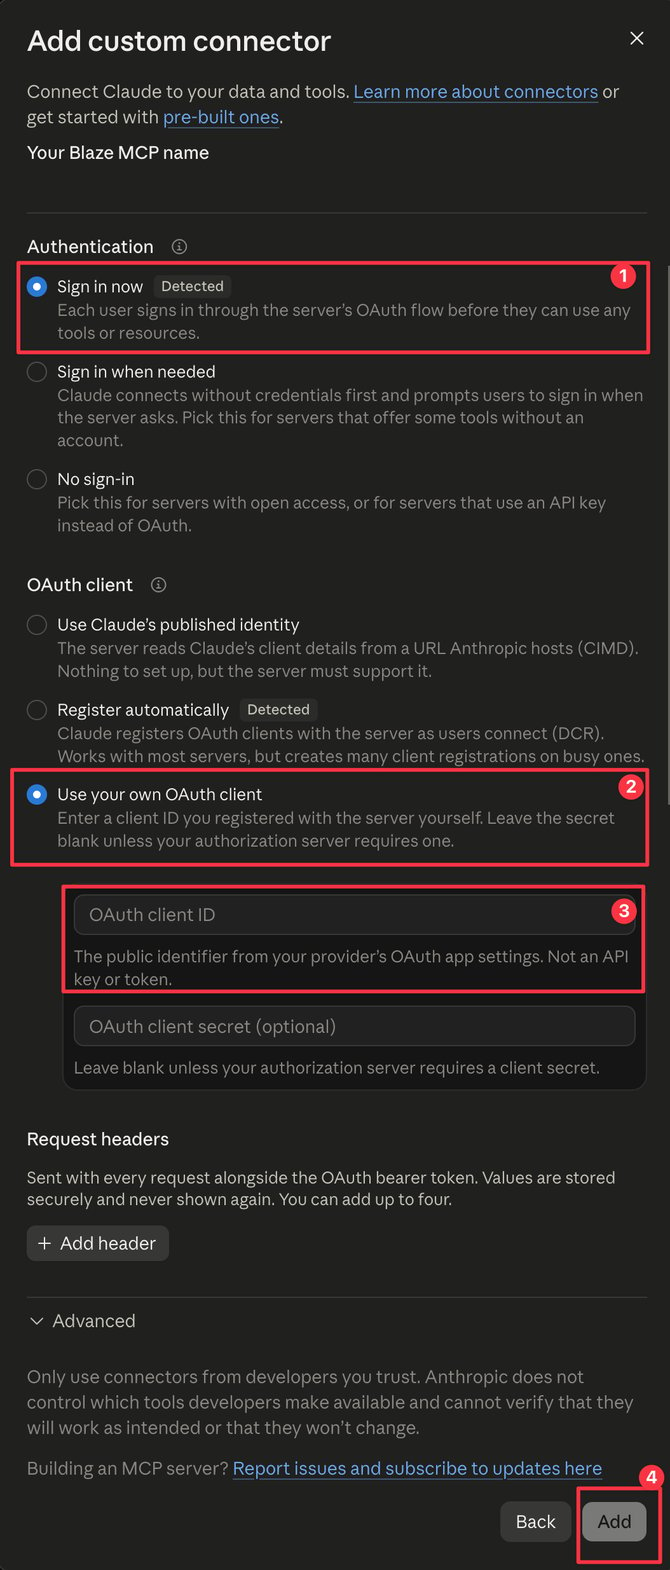
- Click Add.
- Locate the newly added connector in your connectors list, click Connect, and sign in using your BLAZE Single Sign-On (SSO) credentials to complete authorization.
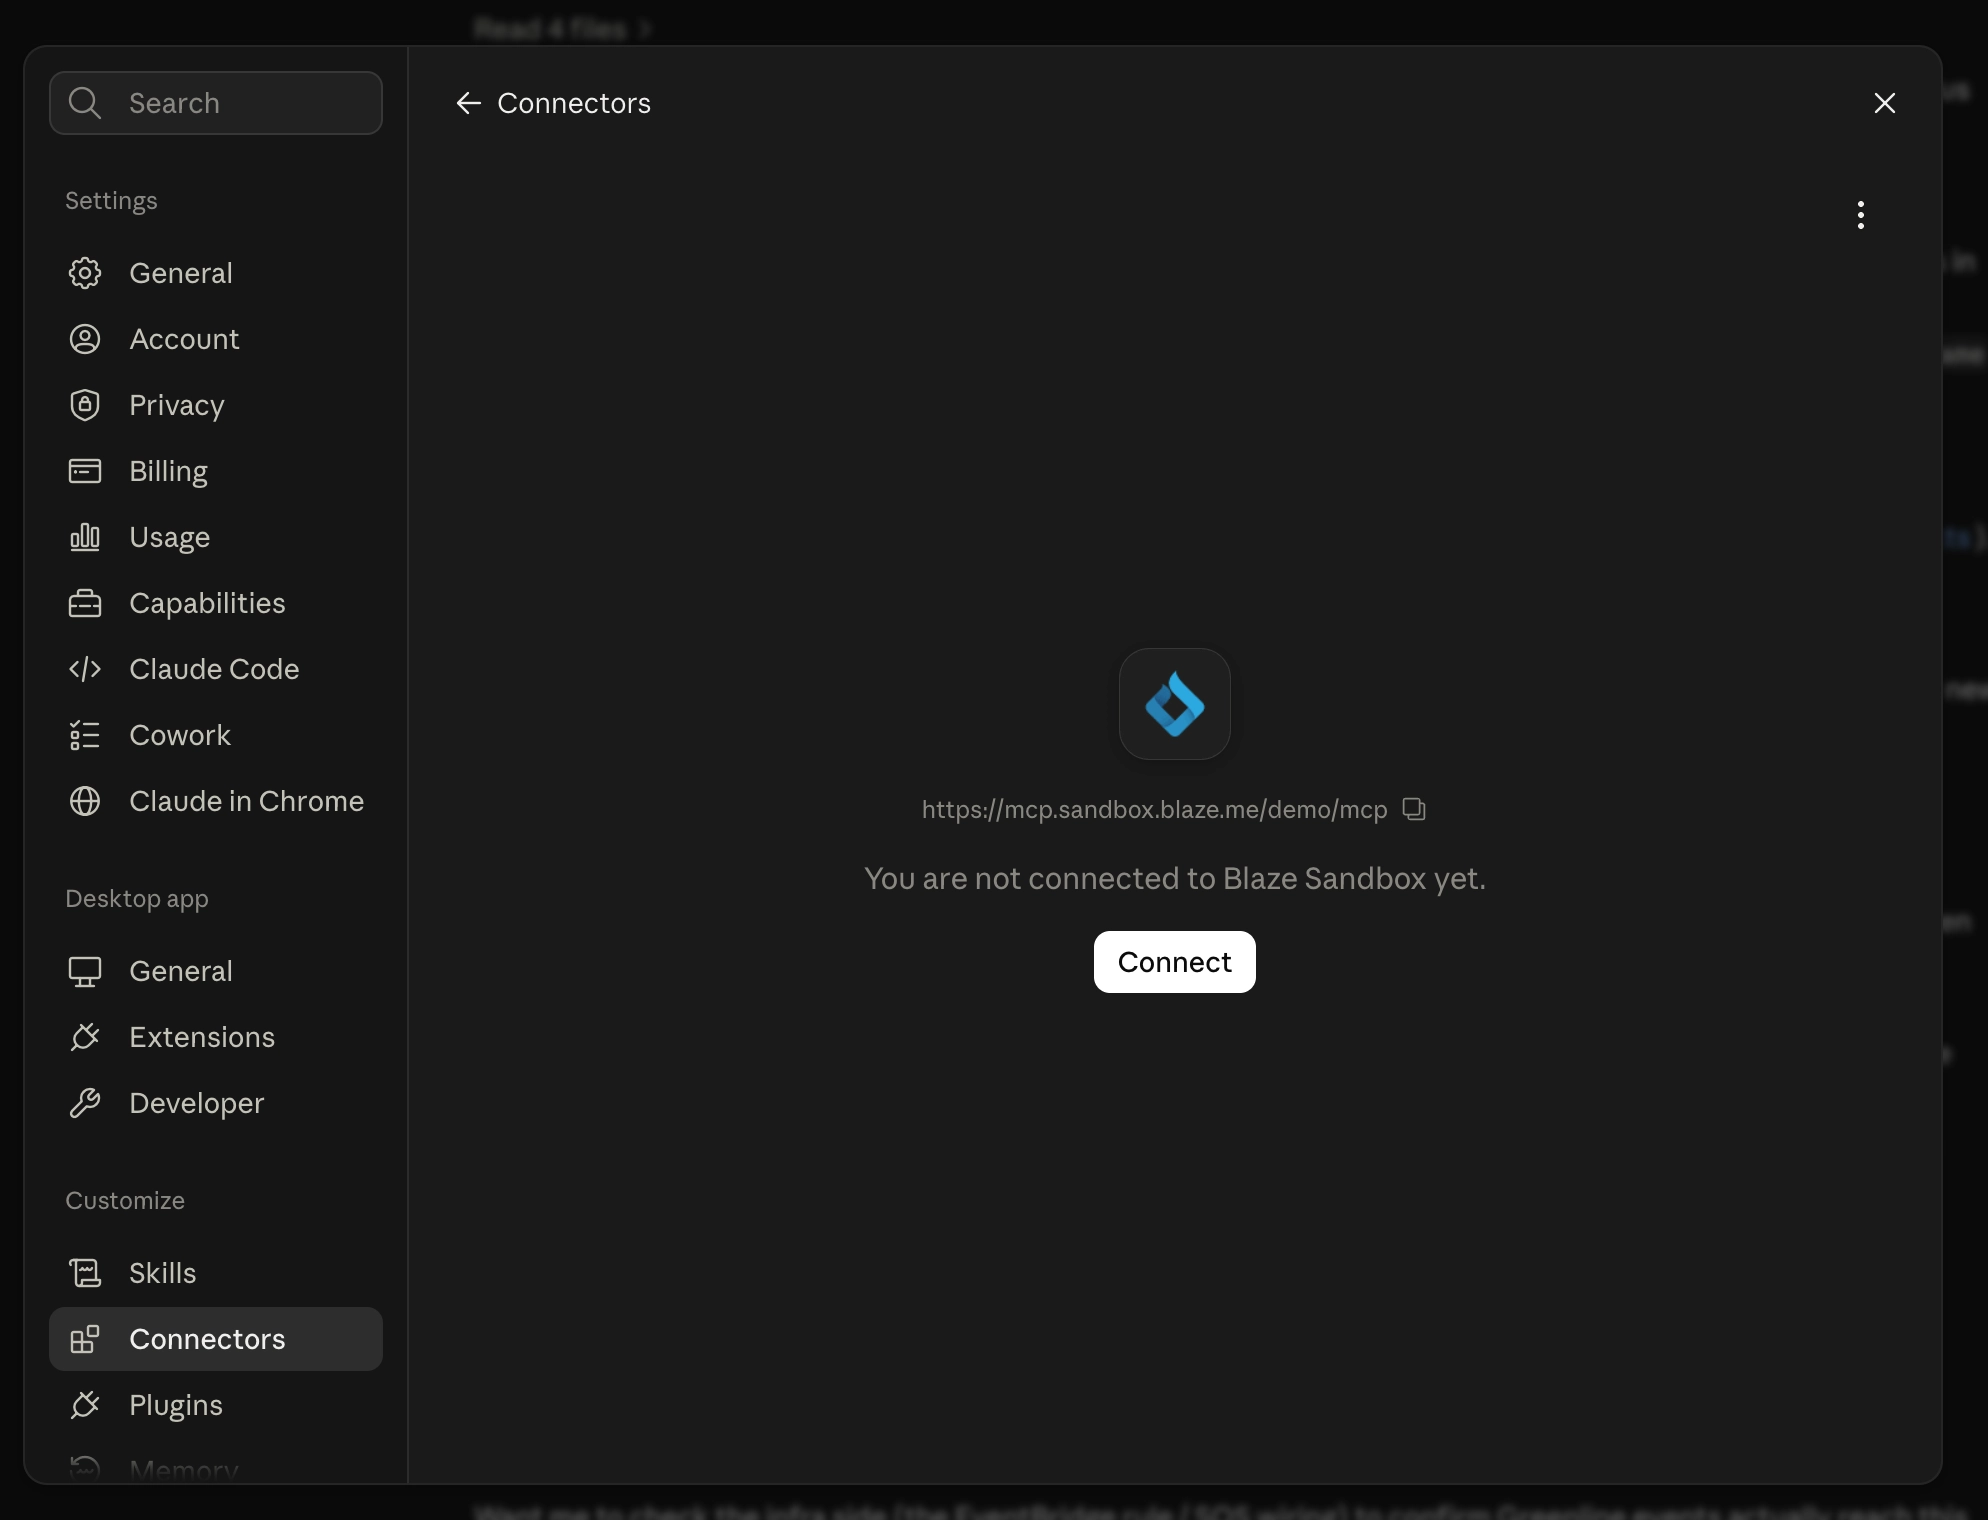
- Test the connection: In a new chat session, ensure your connector is enabled and ask: "Which stores can I access with BLAZE?"
NOTE: On a Claude Team or Enterprise plan, Add custom connector may be grayed out. If this occurs, contact your Claude workspace administrator to add the custom connector for your organization.
XAI (AKA GROK)
How to Connect BLAZE MCP to xAI Grok
Follow these steps to connect your BLAZE MCP endpoint within Grok:
- Log into your Grok workspace via the web client.
- In the sidebar, navigate to Settings > Integrations (or Custom Tools / MCP).
- Click Add Custom Tool or Add MCP Server.
- Configure the server connection settings:
- Name: Enter a descriptive label (e.g.,
BLAZE Retail). - Connection URL / Server URL: Enter the appropriate Server URL (e.g.,
[https://retail-mcp.blaze.me/retail/mcp](https://retail-mcp.blaze.me/retail/mcp)). - Authentication Type: Select OAuth 2.0.
- Name: Enter a descriptive label (e.g.,
- Expand the Advanced OAuth Settings and enter:
- Registration Method: Select User-Defined OAuth Client.
- OAuth Client ID: Enter
discovery-retail-mcp(or the connector-specific ID). - Token Endpoint Auth Method: Select None.
- Click Save & Authorize.
- When redirected to the BLAZE single sign-on screen, enter your active BLAZE login credentials.
- Verify that the connector appears active in your Grok tools list.
If you are still running into any issues connecting the Blaze MCP to your Grok please reach out to support@blaze.me or reach out to us via chat.
Microsoft CoPilot
How to Connect BLAZE MCP to Microsoft Copilot
Follow these steps to configure BLAZE MCP within Microsoft Copilot Studio or the Copilot Extensions portal:
- Open Microsoft Copilot Studio or navigate to your Copilot portal settings.
- In the navigation panel, go to Plugins > Add an Extension or select Custom Connectors > Create New.
- Select Model Context Protocol (MCP) as the integration type.
- Fill in the connector details:
- Display Name: Enter
BLAZE RetailorBLAZE Ecom. - MCP Endpoint URL: Paste the relevant BLAZE MCP Server URL.
- Display Name: Enter
- Under Security / Authentication, configure:
- Authentication: Select OAuth 2.0.
- Client ID: Enter the corresponding OAuth Client ID from the configuration table.
- Client Secret / Token Method: Set authentication type to None / PKCE (User-Defined).
- Click Create and select Connect.
- Authenticate using your BLAZE credentials to grant permission.
- Confirm the extension is published and enabled for your chat workspace.
If you are still running into any issues connecting the Blaze MCP to your Co-Pilot please reach out to support@blaze.me or reach out to us via chat.
How to Structure Prompts
To execute store changes accurately, structure your request with three clear components:
- The Store: "At the Downtown store..."
- The Action: "...change Saturday pickup hours..."
- The Details: "...to 10 AM – 8 PM."
When a change is requested, the assistant displays the current setting, describes the planned modification, and prompts you to select Allow before applying updates.
Sample Queries
You can ask your AI assistant questions in natural language. The assistant can perform single queries or chain multiple steps together (e.g., identifying slow-moving products and constructing a promotion).
- "What’s our current stock on hand for gummies under $30?"
- "How did Saturday’s sales compare to last Saturday?"
- "Which SKUs haven’t sold in the last 30 days?"
- "Pull up order #4821 and tell me the status."
- "Top 10 products by revenue this month at the Oakland store."
- "Make me a promotion that gives 25% off to First Time Patients."
- “Remove the product tag "XYZ" from all tagged products"
- “What’s XYZ's member’s average spend and purchase history?”
- “Show refunds at the Downtown store last week.”
- “Show the inventory action log for XYZ product over the last 30 days.”
- The MCP can chain steps: find slow-moving products, then build a promotion around them
- "Show me my top 30 customers with the highest average order spend."
- Useful audits:
- “Show all banners with their slot, start and end dates” (catches overlaps)
- “List all deals and coupons… and their promo codes”
- a menu health check for products missing images or descriptions
Security and Best Practices
- Maintain Individual Credentials: Never share BLAZE or Mission Control logins. All changes made by an AI assistant are attributed to the logged-in user account.
- Verify Store Targets: Check the store name in the approval confirmation prompt before selecting Allow.
- Audit Prior Settings: Query the current configuration before initiating changes so settings can be reverted if needed.
- Do Not Disable Approvals: Keep confirmation prompts enabled for all create, update, or delete operations.
- Incremental Testing: Test multi-store changes on a single store location first to verify results before batch updating.
- Back Up Before Deleting: Clearing delivery maps removes active delivery zones immediately. Deleted promotional banners and holiday hours cannot be restored automatically.
- Review Multi-Store Scope: Certain deal and page configurations apply globally across all stores in an organization group.
- Verify Execution: Ask the AI assistant to read back updated settings or inspect the live menu directly to verify changes.
- Read-Only Access: If you only require analytical reporting, connect using a view-only login or disable modification tools in your connector configuration.
- Data Privacy: AI chat responses may display internal store configurations and key data. Avoid pasting raw chat outputs into public channels.
Disabling MCP Access
To disable MCP functionality across all connected AI assistants for your entire account:
- Log into BLAZE as an Account Admin or Owner.
- Navigate to Settings > Products.
- Toggle off the MCP add-on.
WARNING: Disabling the MCP add-on immediately revokes API access for all connected AI assistants across the entire account.
Troubleshooting
- "MCP isn't enabled" Error: Verify with your Account Admin that the MCP add-on is active in Settings > Products.
- Missing Stores or Data: The AI assistant enforces user-level permissions. Ensure your BLAZE user role has access to the missing store locations, then disconnect and reconnect the connector.
- Assistant Is Not Responding via BLAZE: Ensure the BLAZE connector is toggled ON for your active chat session.
- "Add custom connector" Option Grayed Out (Claude): Contact your Claude workspace admin to enable custom connectors or add the server globally.
- Changes Do Not Save: Settings controlled directly by your POS or main BLAZE core settings cannot be updated via Retail MCP. Make these edits directly within BLAZE Retail.
- Authentication or Sign-In Errors: Disconnect the connector in your AI app settings and perform the authorization process again.
Need Help?
If issues persist, contact support@blaze.me or your BLAZE representative. Please provide:
- Your BLAZE Store Name
- The exact prompt given to the AI assistant
- The timestamp of the request