
Promote deals and featured products with a rotating banner at the top of your ECOM menu.
What to expect
- Setup takes about 5 minutes. Most of the time goes into preparing your two images.
- Every banner needs two images. You upload one for desktop and one for mobile so the banner looks right on every screen.
- Banners rotate automatically. They slide across the top of all menu pages, showing each banner for about 5 seconds.
Before you start, you'll need:
- Access to ECOM Mission Control at ecom.blaze.me
- A desktop image and a mobile image, each 500 KB or smaller
- The menu page or link you want customers to land on when they click the banner (optional)
Image specifications
| Image | Recommended size | Max file size |
|---|---|---|
| Desktop | 2680 × 360 px | 500 KB |
| Mobile | 1800 × 810 px | 500 KB |
💡Tip: The recommended sizes are also shown next to each Upload button. Designing at these sizes keeps your banner sharp on high-resolution screens.
Upload a banner
- Log in to ECOM Mission Control at ecom.blaze.me and select your store.
- In the left menu, go to Marketing › Content › Banners.
- Click + Add banner.
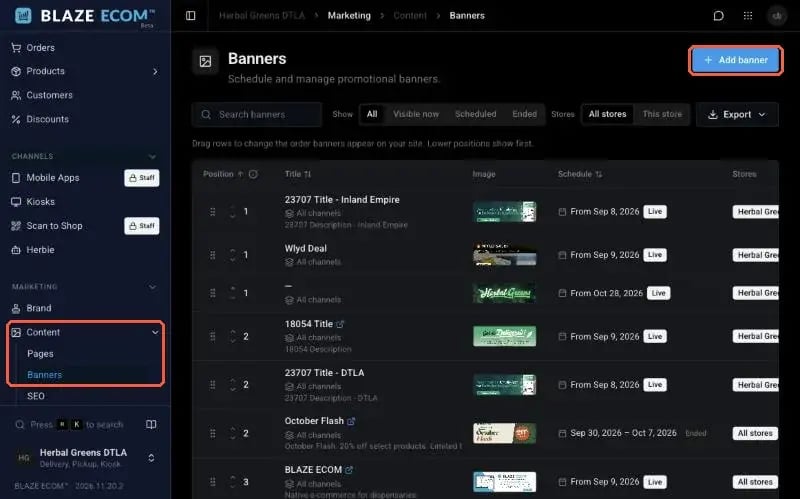
- On the Content tab, enter a Title. You can also add a Description and a Position (lower numbers show first).
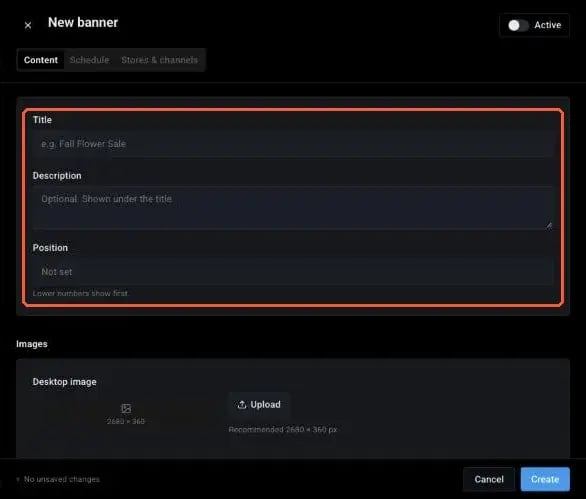
- Under Images, click Upload to add your Desktop image and your Mobile image.
- Under Link, enter a Destination URL (optional). Use a menu path such as /deals or a full link starting with https://.
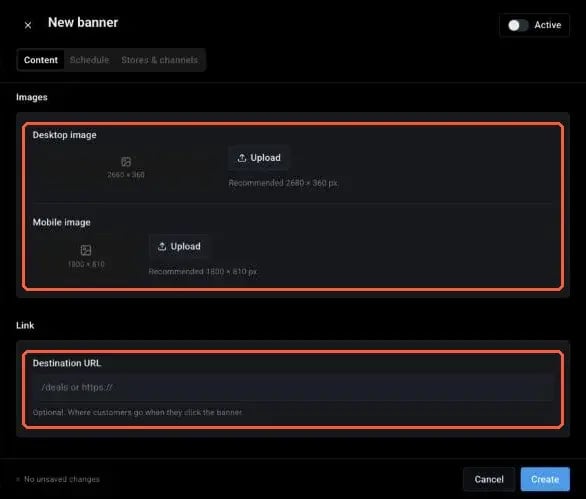
- On the Schedule tab, set the Start and End date and time. Under When, choose the Weekdays and an optional Time of day.
- On the Stores & channels tab, choose the Stores and Channels (E-commerce, Mobile app, Kiosk) where the banner should appear.
- Turn on the Active switch at the top of the panel.
- Click Create.
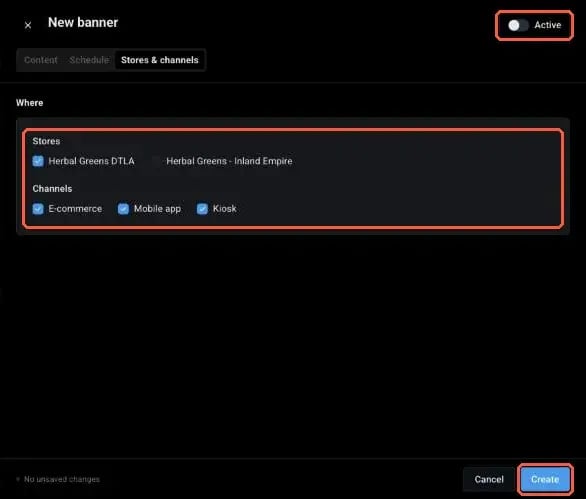
💡Tip: New banners start with Active turned off. If you skip step 9, the banner is saved but won't appear on your menu.
💡Tip: Link the banner to a menu page that shows the products you're promoting, so customers land right where they can shop the deal.
Schedule and visibility settings
| Setting | What it does | Default or if left blank |
|---|---|---|
| Start / End | The dates and times the banner runs | Leave End empty to keep the banner running |
| Weekdays | The days of the week the banner shows | All days are selected by default |
| Time of day | A daily start and end time | Leave empty to show the banner all day |
| Stores | Which locations show the banner | Choose one store for a location-specific deal, or several to share it |
| Channels | E-commerce, Mobile app, and Kiosk | All channels are selected by default |
| Position | The banner's order in the rotation | Lower numbers show first |
Manage existing banners
- Use Show (All, Visible now, Scheduled, Ended) and Stores (All stores, This store) at the top of the Banners page to filter the list.
- Drag rows to change the order banners appear on your site. Lower positions show first.
- Use the Active switch on any row to turn a banner on or off.
- To change a banner, open it and update its fields.
Troubleshooting
- "My banner isn't showing on the menu": Check that Active is turned on, then check the Start/End dates, Weekdays, and Time of day, and confirm the correct store and channels are selected.
- "My image won't upload": Make sure the file is 500 KB or smaller. Compress it and try again.
- "My banner looks stretched or blurry": Re-export the image at the recommended size for desktop or mobile.
- "My banner shows on desktop but not on mobile (or the other way around)": Confirm both a desktop and a mobile image are uploaded.
Need help?
Contact ecomsupport@blaze.me or your BLAZE representative. Include the store name, the banner title, and a screenshot of what you're seeing.