.png?width=140&height=37&name=BLAZE-Logo-Blue%20(2).png)
A company-wide merge run checks every member profile across your entire organization for potential duplicates in a single pass. The process follows five distinct stages: Set up, Scan, Review, Merge, and Done.
Nothing is permanently altered or written to customer profiles until the Merge step, and only the groups you explicitly review and confirm will be merged.
Prerequisites
- Store Manager or Company-Level Dashboard user permissions.
Before You Start
- One Run at a Time: Only one merge run can be active in your company at any given time. While a run is in progress (scanning, reviewing, merging, or paused), the manual Find a member tool cannot merge records, and existing merges cannot be undone. You must finish or cancel an active run before starting a new one.
- Merge Known Duplicates First: If you already know specific customer profiles that need merging, resolve them using Find a member before initiating a full company scan.
- Inform Register Staff: When secondary profiles are merged, searching for customers at the POS using secondary phone numbers or email addresses may not return the main record. Scanning the customer's driver's license will always pull up their active main profile.
- Preserve Secondary Records: Do not delete secondary records after a merge. Secondary profiles retain their own purchase histories and remain securely linked to the main profile.
- Postpone Member Imports: Avoid running bulk customer CSV imports immediately after completing a merge run, as re-importing profiles can overwrite alternate contact details copied during the merge.
- Scan Timing: Scanning large member databases may take several minutes. You can safely navigate away from the page while the scan completes in the background.
Step 1: Set Up
- Navigate to TOOLS > Member Merge in the left sidebar and click New merge run.
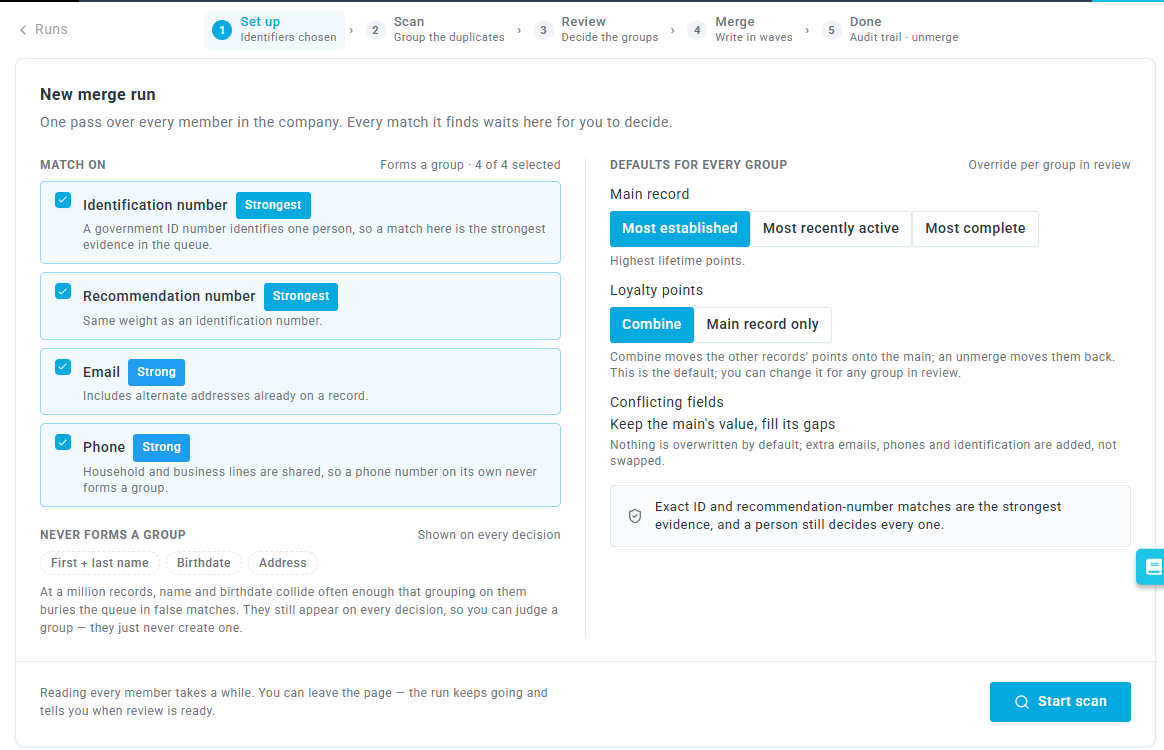
- Under Match on, review and select the identifiers used to group potential duplicates:
| Identifier | Match Strength | Description |
| Identification number | Strongest | Matches profiles sharing the same driver's license or state ID. |
| Recommendation number | Strongest | Matches profiles sharing the same medical recommendation number. |
| Strong | Matches profiles sharing a primary email address. | |
| Phone | Strong | Matches profiles sharing a primary phone number. |
NOTE: Fields under Never forms a group (First + last name, Birthdate, and Address) are never used as standalone triggers to create groups because they are shared by too
many unrelated people. However, they are displayed side-by-side during review.
- Under Defaults for every group, configure Loyalty points:
- Combine: (Default) Moves all available loyalty points from secondary records onto the main profile.
- Main record only: Keeps each profile's point balance on its respective record without transferring points.
- Click Start scan.
NOTE: By default, the profile with the most lifetime loyalty points is designated as the main record. You can select a different main profile for any group during the review stage.
Step 2: Scan
During the scan, the screen displays progress as it moves through Reading members, Grouping duplicates, Writing groups, and Ready for review, along with a live count of processed profiles.
- You can navigate away from the page while the scan runs; no data is written to customer records during this step.
- To stop the process, click Cancel run. Canceling only discards the current scan.
- If you remain on the page, the review screen opens automatically once scanning finishes. If you leave, return to TOOLS > Member Merge > Runs and click Continue review on the top row.
Step 3: Review
Review each flagged group to confirm valid matches or separate distinct customers.
- Confirming a group records your approval only—it does not merge records immediately.
- Use the match-type filter buttons (ID or rec number, Email + phone, Email only, Phone only) to work through groups systematically.
- Ensure you evaluate all intended groups before initiating the merge. Clicking the merge button completes the review phase; any undecided groups are dropped and deferred to future scans.
- If you review all groups and confirm none of them, the merge button remains disabled. Cancel the run from the Runs tab to close it.
Step 4: Merge
- When you have finished reviewing, click Merge [X] confirmed at the top right of the review screen. The number reflects the total confirmed groups. Merging begins immediately without a secondary confirmation prompt.
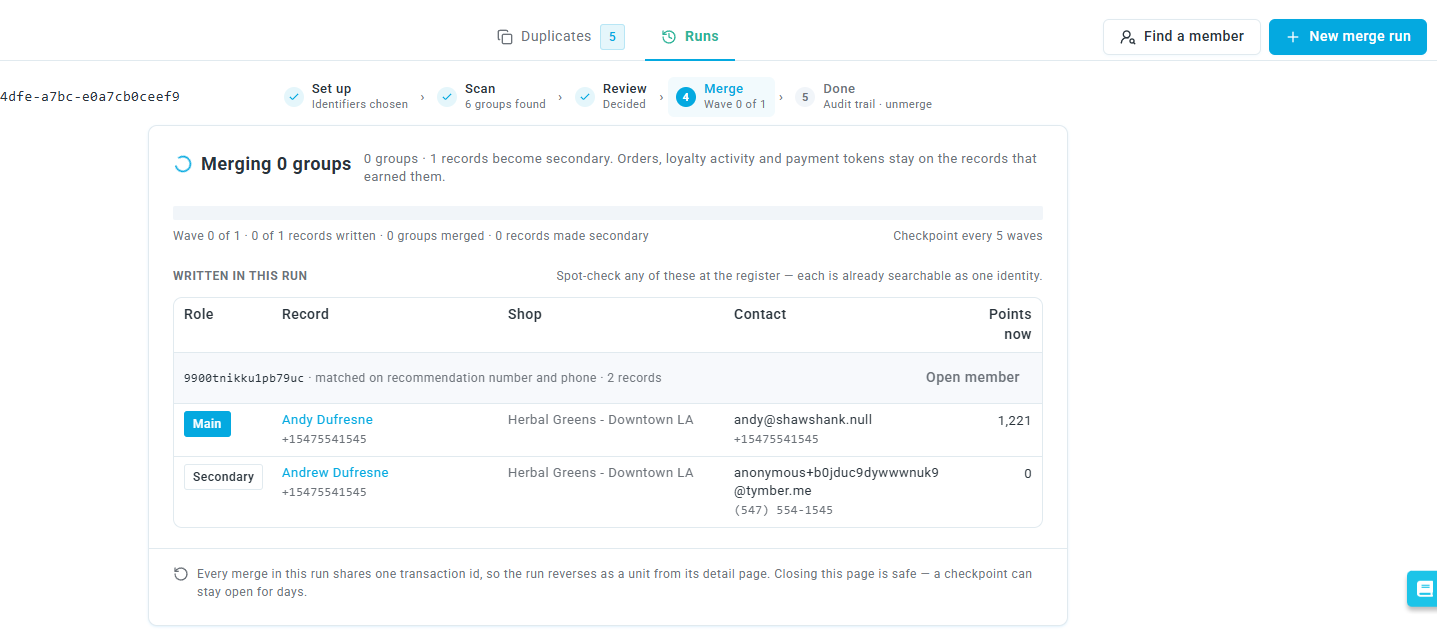
- The screen displays Merging [X] groups and writes records in consecutive batches called waves.
- You can safely close your browser; the merge continues processing in the background.
- Once completed, the screen opens the finalized Done summary page.
NOTE (High-Volume Accounts): Merges involving more than 125,000 records pause automatically after every five waves and display Paused at a checkpoint. The records processed up to that point are already merged. Spot-check customer lookups at the POS, then click Resume to continue the remaining waves, or select Stop here and keep what is done to conclude the run. Checkpoints expire after 30 days.
Step 5: Done & Audit Trail
Once the merge finishes, the run summary page documents the results:
- Metrics: Displays counts for Groups merged, Records made secondary, and Groups found.
- Groups Not Merged: Displays groups that BLAZE could not process (typically because a member profile was edited during review or a group exceeded size limits). Start a new run to capture profiles modified during the process.
- Run Details: Lists matching criteria, points settings, and the unique Run ID (keep this accessible if contacting Support).
- What Was Merged: An itemized audit log detailing every main and secondary record, shop location, and contact information. You can search by member ID, member number, or group ID.
NOTE: The detailed group audit list is retained for 30 days following the merge. Summary metrics remain available permanently. If you need to reverse a merge during the beta period, contact your Customer Success Manager or BLAZE Support.
Managing the Runs Tab
The Runs tab lists all historical and active merge operations, detailing completion dates, run statuses, initiators, and reversibility.
- Status Filtering: Filter runs by All, Completed, Cancelled, or Failed, or search by the team member who initiated the scan.
- Active Runs: Active runs are pinned to the top with their current phase (Scanning, In review, Merging, or Paused at a checkpoint) alongside options to Continue review or Cancel.
- Manual Merges: Merges completed using Find a member are recorded here with the label "built by hand".
- Audit Inspection: Click any completed run to view its summary, select Browse all to view merged groups, or click Full audit trail to open the complete run report.
IMPORTANT: Clicking Cancel on a run takes effect immediately:
- During Scan: Discards the scan progress with no impact on data.
- During Review: Discards all pending merge decisions. Pairs marked as "Not a duplicate" remain saved.
- During/After Merge: Any records already written in completed waves stay merged.
Troubleshooting
- Screen does not respond when clicking controls: If buttons such as Start scan, Merge confirmed, Cancel, or Resume do not respond, refresh your browser and inspect the Runs tab. Verify whether another run is active or an unmerge process is currently running.
- Cannot resume or merge an older run: Merge runs cannot be resumed or executed more than 30 days after the initial scan date. If a run has expired, start a New merge run.
- Duplicates tab displays zeros after merging: This is standard behavior. When a run completes, its results are archived. To scan for newly created duplicate profiles, initiate a new merge run.