
DispatchPro Configuration
Before beginning the setup for DispatchPro, please gather the following information
- Delivery Tax Rates
- Regions
- KML files for region coverage
- Driver Setup Information
If you need assistance, please contact BLAZE support via chat, phone, or email.
BLAZE phone support: 415.964.5689 option 1
BLAZE email support: support@blaze.me
Configurations
NOTE: Perform the setup in this order.
- Enable Incoming Orders
- Enable the Delivery Queue
- Company Settings
- Online Store
- Delivery Tax Rates
- Set up Regions
- Assign the region to the Delivery Tax Rate
- Inventories
- Terminals
- Driver Setup
- Manage Employee Access
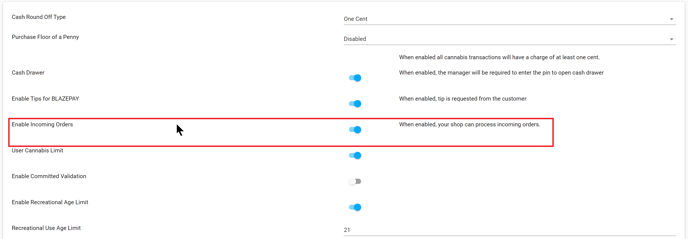
Enable Incoming Orders
NOTE: This setting must be completed for each shop
- Global Settings > Current Shop Settings
- Click the Edit button
- In the third section, Enable Incoming Orders
Enable the Delivery Queue
This setting must be completed for each shop.
- Global Settings > Current Shop Settings
- In the last section, Enable the Delivery Queue
- Click on the Save button at the top when finished.

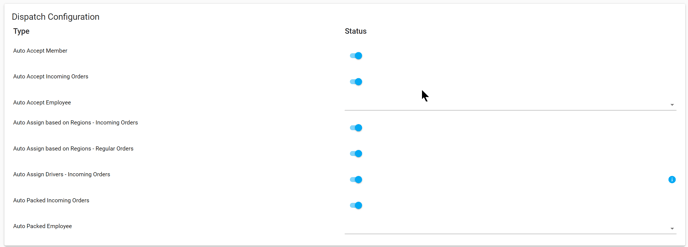
Company Settings
- Global Settings > Company Settings > Company Info
- Click on the Edit Button
- Scroll down to the Dispatch Configuration section
- Auto Accept Member: Enabled or Disabled
- Auto Accept Incoming Orders: Enabled or Disabled
- Auto Assign based on Regions - Incoming Orders: Enabled or Disabled
- Auto Accept Employee: Select the employee profile to accept the Incoming Order
- Auto Assign based on Regions - Regular Orders: Enabled or Disabled
- Auto Assign Drivers - Incoming Orders: Enabled or Disabled
NOTE: For drivers to correctly be auto-assigned to orders, the driver must be assigned to a terminal with the same Region and Inventory assignment as the order.
-
- Auto Packed Incoming Orders: Enabled or Disabled
- Auto Packed Employee: Select the employee profile as the order packer
- Auto Packed Incoming Orders: Enabled or Disabled
Online Store
This setting must be completed for each shop.
- Global Settings > Current Shop Settings > Online Store
- Click the Edit button in the upper right corner
- Scroll to the section Enable specific inventory
NOTE: Disabled: Disables the Validate Inventory Availability setting
- Enabled:
- Validate Inventory Availability:
- By Inventory: Online store displays only products from either all inventories or a single specified inventory to all customers.
- By Nearby Region: Online store displays products from the inventories assigned to a region that the customer’s online store account address matches. If there is no matching address, the online store displays all products.
- By Nearby Region + Default Region: Online store displays products from the inventories assigned to a region that the customer’s online store account address matches. If there is no matching address the online store displays products from the inventory assigned to the default region.
- Choose Inventory:
- Validate Inventory Availability:

Delivery Tax Rates
NOTE: This setting must be completed for each shop.
NOTE: Do not add your regions in the Delivery Tax Rates until after the region has been created.
- Follow the steps in Setting Up and Managing Delivery Tax Rates to set up your Delivery Tax Rates
4. Set up Regions
NOTE: 1. A "Default" region needs to be assigned for the auto-assign feature to function properly.
2. All fields are required
3. You must have 1 Tax Rule
- Navigate to Global Settings > Company Settings > Regions
- If there are not any existing active regions, click the Add Region button to create a new parameter
- If there are any existing active regions, click the Edit button to update the parameters
- Region Name: The name of the region. Required
- Active: This setting allows the region to be used when enabled
- Default Region: Enable for the default region that gets applied to orders
- Delivery Fee: Dollar amount that gets charged as the delivery fee
- Opening Hours: The specific time that this region can start to process orders
- Closing Hours: The specific time that this region stops processing orders
- Days Closed: The specific day(s) that this region is closed
- Min Cart Subtotal: The minimum the cart subtotal must be to process an order
- Free Delivery After: The minimum amount the cart subtotal must be to get free delivery
- Delivery Tax Rate: The tax settings for the region
- Inherit from Shop or select the Delivery Tax Rate
- You can also create a Delivery Tax Rate with the button.
NOTE: A region can be linked to only 1 Delivery Tax Rate, but a Delivery Tax Rate can be assigned to multiple regions. If a Delivery Tax Rate is disabled, then the auto-assign process will consider the shop taxes.
Zones: The zone determines where this region applies
-
- Zipcodes: The zip codes that will apply to this region. Required
- KML: Only 1 active KML per region
NOTE: Zipcodes must be unique to a region
NOTE: KML areas can overlap, but if they do they will need to have unique operating hours
How to create a KML file using Google Maps.
NOTE: Best practice is to use KML files for region coverage.
- To create KML files, use this link.
Assign the region to the Delivery Tax Rate
NOTE: This setting must be completed for each shop.
- Global Settings > Current Shop Settings > Delivery Tax Rates
- Edit each Delivery Tax Rate and assign the region.
- Save each Delivery Tax Rate as you edit.
- For more information on Delivery Tax Rates, click on this link
Inventories
NOTE: This setting must be completed for each shop.
- Global Settings > Current Shop Settings > Inventories
- Verify that the Inventory to be used for the terminal has the correct region assigned to it, or enter the region for that inventory.
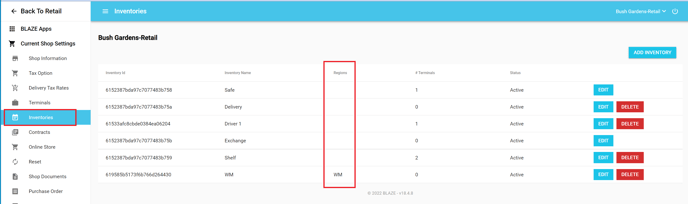
NOTE: Make sure that your terminal is pointing to the correct Inventory and also that the Inventory has the correct region assigned to it.
Terminals
NOTE: This setting must be completed for each shop.
Use this Terminal Overview document to verify or create your terminal or use the quick steps below
- Navigate to Global Settings > Current Shop Settings > Terminals.
- If the terminals need to be added, click the Add Terminal button. If terminals exist, click the Edit button next to the desired terminal to modify.
- Enter the Terminal name
- Set the Assigned Inventory to the inventory created
- Set the status to active.
- Click the Save button
Driver Setup
For more information on creating employees, click on this link How to add Employees in Global Settings.
NOTE: The following fields are required for the driver employee profile
- Global Settings > Manage Employees
- Click the View button to select a driver or click Add Employee to create a new driver
- First Name: First name
- Last Name: Last name
- Position: Delivery Driver
- Is Driver: Enabled
- Phone Number: Must be a valid phone number
- Email Address: email address
- Password: Password
- Pin: Must be unique per user
- Assigned Shops: Shops that this employee will work at
- Assigned Terminal: Mandatory if the Regions, Inventories, and Terminals are configured and assigned to a driver
- Click on the Save / Update button
NOTE: In the Assigned Terminal field, the Terminal list will be filled with the current site selected in the upper right corner. If you want to assign the driver a terminal from another store, you must switch between stores first. Also, make sure that the employee is assigned to a shop where the terminal is located
If you have further questions, please reach out to us at support@blaze.me!