
Creating a Dashboard
How to create a dashboard
A dashboard may consist of one or more tabs. When creating a new dashboard, you will need to start with a new tab.
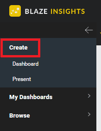
- Click on the 3 Horizontal Lines
![]()
- Click on Create
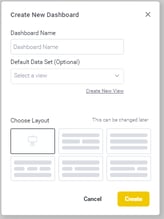
- A popup for the dashboard will appear
- Dashboard Name: enter the name of the dashboard
- Default Data Set (Optional): select a view, data set, or leave blank
- Create New View: this option will take you to the dashboard canvas to create a new dashboard view
- Choose Layout: select the dashboard layout or the dashboard canvas (first option)
- Click on the Create button to continue
- The tab layout of your selection will appear in edit mode on the dashboard. Shown is the dashboard canvas. See Understanding the Dashboard Builder for details of the canvas.
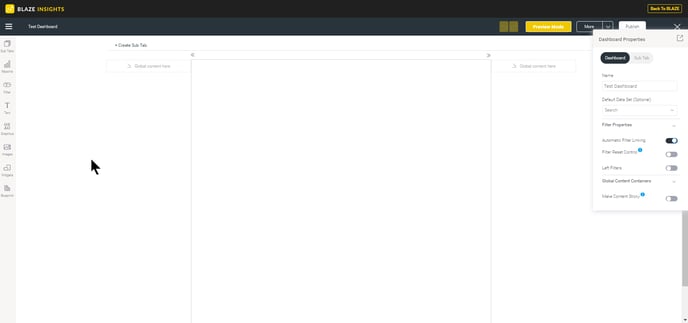
- You can now create more sub-tabs, and add other dashboard objects to any of the sub-tabs via the left-side widget navigation Dashboard Sub Tabs
- The dashboard builder autosaves the dashboard as a draft, as you continue to edit it
- View and test your dashboard in preview mode before publishing and sharing it. Click on the Preview Mode button in the top-right corner.
- You can go back to edit mode to make further changes, by clicking on the Edit Dashboard button in the top right corner
![]()
- Once the dashboard is ready, click on the Publish button to publish and share it with other users
![]()
Dashboard properties
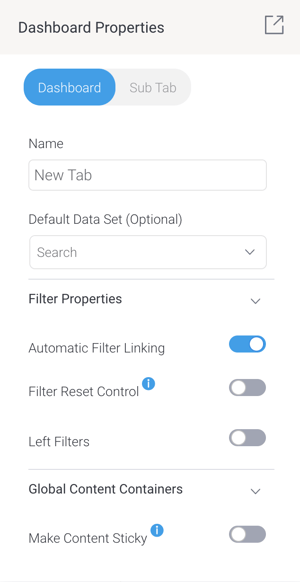
NOTE: These property options will differ based on the selected dashboard template; the dashboard layouts will have limited property options, whereas the canvas will have all.
-
Name: This field contains the current name of your dashboard. Click on the field to update the name.
- Default Data Set: This optional setting lets you select a default view or data set for your dashboard.
-
Automatic filter linking: This toggle, which is on by default, lets you automatically link your dashboard filters. Dashboard Filters
- Filter Reset Control: This toggle, disabled by default, can be enabled so that the Reset button in a Filter Widget control panel will reset the entire dashboard to its original state. This will reset all filters and other dashboard interactions, including drill functions, applied by the user.
-
Left filters: This toggle, disabled by default, can be enabled to hide or display the button for left side navigation filters on your dashboard. When enabled the following toggles become available:
-
Hide Reset Link: Enable to hide the link to reset this panel of filters
-
Hide Control Panel: Enable to hide all the control panels on this panel of filters (Reset link, Apply button and the Refresh Cached Filters icon)
-
Auto run filters: Enable to automatically run reports when filter values are selected or changed, without having to use the Apply button.
-
- Make Content Sticky: This toggle, disabled by default, can be enabled to keep any global content containers (filters, associated reports, etc) fixed in position so they're always visible when scrolling through dashboard content — effectively locking the global content container content to the screen. Content is sticky in preview and publish modes, but not in edit mode.
- NOTE:
- This option is not available in Internet Explorer (the browser is no longer supported).
- This option is not supported in full-screen mode.
- Content containers will display a scrollbar if they contain too much content to display on your screen.