After receiving your Cashless ATM payment terminals the credentials can be added to the BLAZE Global Settings. To add the terminal credentials you will need the card reader TPN, Authorization Key, and Register ID the processor provides.
1. Navigate to Global Settings > Current Shop Settings > BLAZEPAY Settings to see your list of terminals.

Here you can click on 'EDIT' on the right to change the name or credentials of a terminal. You can also click 'ADD POS TERMINAL' at the top right of the page to add a new terminal.
2. This step is only needed if you are ADDING a new terminal. Once you have clicked 'ADD POS TERMINAL' at the top right of the screen a smaller window will appear that asks for the following details:
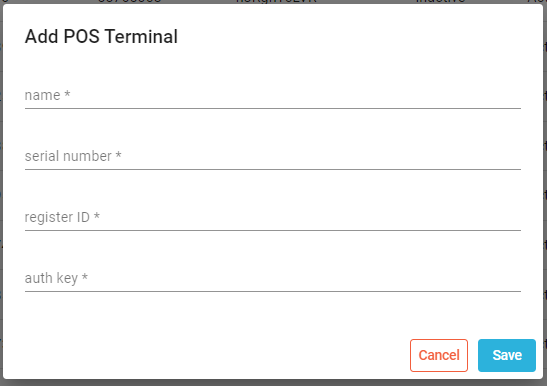
- Name: This is what you want to call the terminal, it doesn't affect its ability to transact or connect with BLAZE. This is typically where we assign a number designation to the terminal.
- Serial Number: This field is where the SN or TPN of a terminal is put. If you do not already know the SN or TPN of your terminal, contact BLAZE Payments Support for assistance.
- Register ID: This field is where the SPIN Register ID is put. If you do not already know the SN or TPN of your terminal, contact BLAZE Payments Support for assistance.
- Auth Key: This field is where the SPIN Auth Key is put. This will always be the same for all terminals that are assigned to a specific shop location. If you already have other terminals set up on the previous page you can copy-paste the Auth Key from any of those.
3. Once you have filled the fields, click 'Save' and you will see your new terminal appear in the list. You will notice that on the far right under the 'Processors' header, there will be "1, 2, 3". This will need to be adjusted to only contain 1 just like all your other terminals. To do this, click the blue 'EDIT' button on the right, and click the small x to the left of Processor 2 & Processor 3, followed by the blue 'SAVE' button. (Process pictured below)


Assigning CATM Terminals to Cash Drawers
Depending on whether you are a Retail Storefront, a Delivery Only service, or both, the way you assign your CATM Terminals to Cash Drawers in BLAZE can change. Below is an outline of the two major assignment methods used by our customers.
Static Assignment
The first method of assigning CATM terminals to Cash Drawers in BLAZE is Static Assignment. Its referred to as Static because it is set once, and then not adjusted unless for a specific support purpose. This works best if your shop operates on a numbered BLAZE Cash drawer per iPad / Driver Phone system.
For example, if your storefront has 2 registers, if your cash drawers in BLAZE are labeled as Reg1 & Reg2 (or something similar) this applies to your setup. If your cash drawers in BLAZE are named for each employee, skip ahead to Dynamic Assignment.
1. Navigate to Global Settings > Current Shop Settings > Terminals
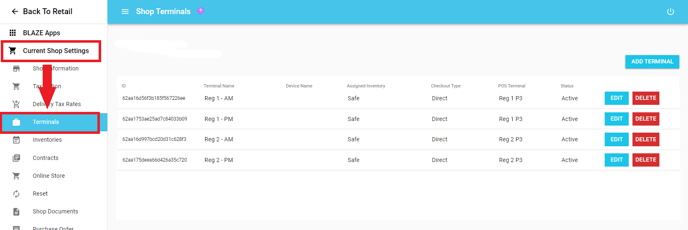
2. You will see a column on the right side of this page labeled 'POS Terminal'. This is where we link a CATM Terminal to your cash drawer. When using Static Assignment simply click 'EDIT' on the right, choose the corresponding named CATM Terminal from the dropdown list, and click 'SAVE'.
Dynamic Assignment
The second method of assigning CATM Terminals to Cash Drawers in BLAZE is Dynamic Assignment. It's referred to as Dynamic because you are changing the assignment on a daily basis. Typically once per shift change. This works best if your shop operates on employee-named BLAZE Cash drawers.
For example, if your storefront has 3 drivers, if your cash drawers in BLAZE are labeled as each of those drivers' names this applies to your setup.
1. Navigate to Global Settings > Current Shop Settings > Terminals

2. You will see a column on the right side of this page labeled 'POS Terminal'. This is where we link a CATM Terminal to your cash drawer. When using Dynamic Assignment it's typical that each shift, each employee could be using a different CATM terminal than the day before. At each shift change, the manager or dispatcher in charge of assigning terminals should have the above page open. As each terminal is assigned to each employee, the manager or dispatcher should click 'EDIT' next to the employee's name, select the correct numbered CATMTerminal, and click 'SAVE'.
NOTE: If you are noticing that automated transactions are going to the wrong CATM Terminal, or that the BLAZEPAY reporting shows the wrong CATM Terminal, it is most common that the assignment above was done in