ECOM | Surfside Commerce Media (SCM) Integration
This article will cover how to connect Surfside with your ECOM Menu
We at BLAZE only integrate with Surfside Commerce Media. Please connect with Surfside directly on their Support pages for any questions you might have regarding their services and Surfside in general: Surfside Commerce Media
Surfside collaborates with brands to display ads on retailer websites and menus, utilizing formats such as banner ads or product placement generating ad revenue.
NOTE: If multiple ECOM stores exist, the Surfside integration must be connected to each ECOM store in Mission Control.
How to connect Surfside Commerce Media with your BLAZE ECOM
Step 1: Connecting Blaze and Surfside:
- Log into BLAZE Mission Control
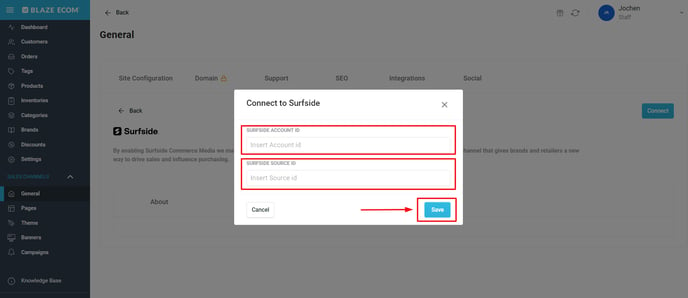
- Under the Sales Channels section, click General → Integrations → Surfside → Connect
- Enter your Surfside Account ID and Surfside Source ID and click Save

Step 2: Activating Surfside Ads:
- In the Mission Control Surfside Integration, navigate to the Settings tab
- Toggle the Activate Banners slider to Active
- Active = Will activate ads on ECOM menu
- Inactive = Will deactivate ads on ECOM menu

Sometimes the slider will not stay activated after navigating to another tab and back to the Settings tab, to troubleshoot this, activate the slider and refresh the page
Step 3: Activating Each Ad Placement:
The Surfside banners will be clickable and appear on your ECOM menu(s) in several different locations via the Surfside provided Placement IDs.
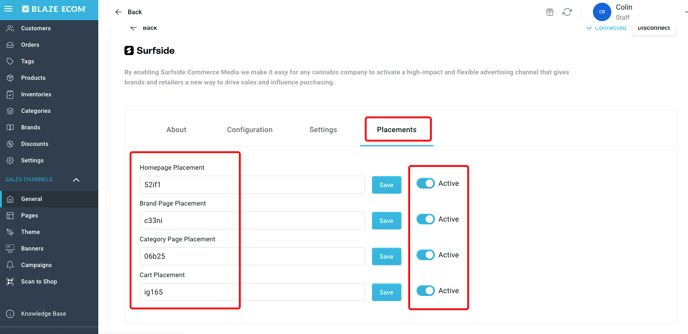
- In the BLAZE Surfside Menu, navigate to the Placements tab
- Insert the corresponding Placement ID provided by Surfside for each ad placement you want to render, click Save for that placement, and make sure the slider is Active.

Surfside Banner Placements can be activated/deactivated as needed via Mission Control and will only show in the Active ECOM locations shown below.
- Homepage:

- Brand Page:

- Category Page:

- Cart Placement:

If you need any assistance with the Surfside dashboard or IDs, please reach out to Surfside Support via the link below:
