
The Check-In is designed to expedite the process of checking in both existing and new members. This app can be found in either the App Store (Apple) or Google Play Store (Android) by searching "BLAZE Check-In."
BLAZE Check-In is available for an additional monthly fee. To gain access to this feature, talk your BLAZE Sales Representative today.
- Once the feature is accessible, the Plugin must be enabled first in the BLAZE Retail Web app.
- The Check-In display can be modified either on the Web or iPad app.
- Once in effect, the Members added to the Check-In Queue will appear within the Web POS tab under "Check-In."
- After adding these Members into the Walk In Queue, their order can be processed.
Navigate to the section that you wish to learn more about for a step-by-step walkthrough.
Web:
Integrate
Talk to a BLAZE Sales Representative to gain access to the Check-In Plugin.
To use our Check-In app, the Plugin must be enabled from the BLAZE Retail Web app.
1. Navigate to the Global Settings. Once redirected, navigate to the Plugin Options tab and click on the "Check-In" section.
2. Enable the Check-In for Company toggle bar.

Edit the Check-In Display
The Check-In's display can be customized to your tastes by modifying the background color or image, as well as the button text color.
1. Ensure the Check-In for Company has been enabled. Click the blue "Edit" button.
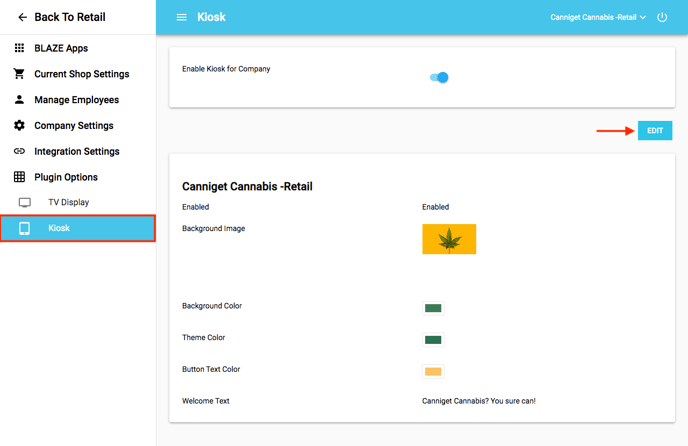
2. The Check-In display can be customized in this section. When satisfied with the changes made, tap the "Save" button, and tap the "Done" button to return back to the Check-In page.
- Enable the toggle bar.
- Set Background Image by clicking the blue "Upload" button. Once an image has been uploaded, a preview of it will appear above. This image will show up as the background of the Check-In screen.
- Set Background, Theme, and Button Text color.
- Set Welcome Text. This will greet your guests as they use the app to check-in.

Queue
The Queue is where orders are managed and processed. Use the tabs at the top to navigate between the different queues available.
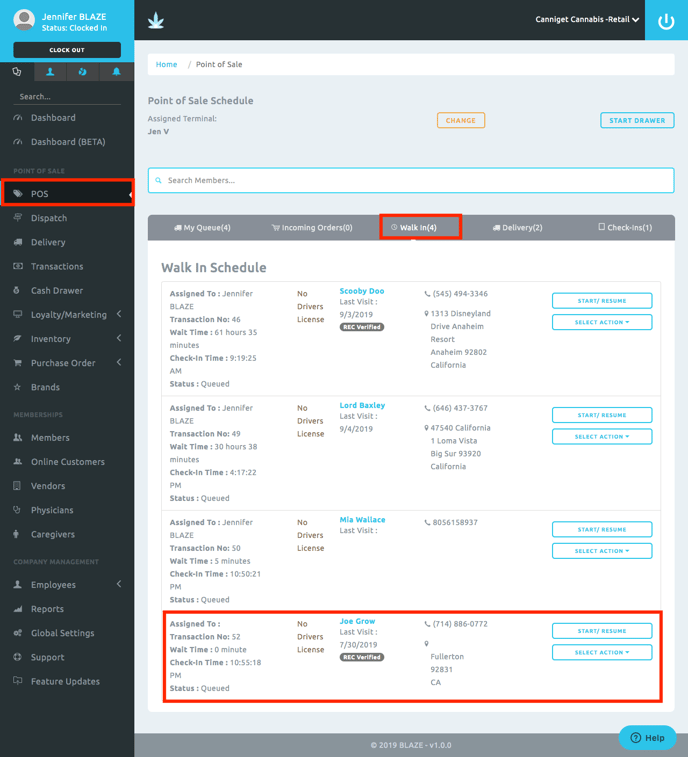
1. Navigate to the "POS" section on the lefthand sidebar. Then, click the "Check-In" tab to view check-ins from the app.

2. Click the blue "Add to Walkin" button on the members you wish to check-in. Click the red "Remove" button to remove a checked-in member.

3. Click on the grey "Walk In" tab to view walk-in members that have been checked in. To learn more about processing an order, read our article here.
Tablet:
Login
1. Enter email and password. Tap the "Login" button.

2. Tap on the shop that appears. If you have multiple shops available, select the one you wish to set up on this tablet.

Edit the Check-In Display
The Check-In's appearance can be customized to your tastes by modifying the background color or image, as well as the button text color.
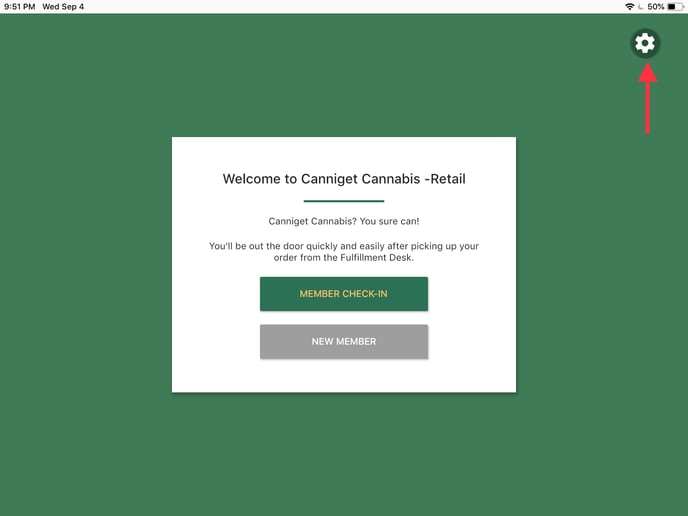
1. After logging in, tap the gear in the upper righthand corner of the page. This will redirect you to the settings page.
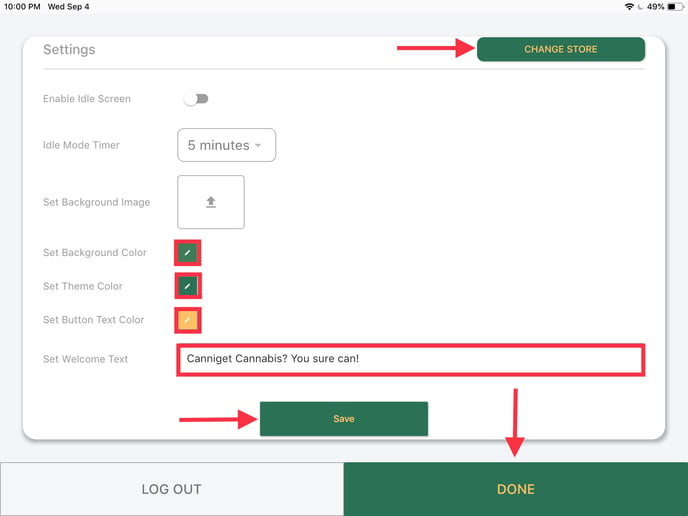
2. The Check-In display can be customized in the Settings page. When satisfied with the changes made, tap the "Save" button, and tap the "Done" button to return back to the Check-In page.
- If you have multiple stores, tap on the "Change Store" button. This will redirect you to a list of available stores to choose from.
- Enable Idle Screen to go off after inactivity and set Idle Mode Timer for 5 to 30 mins.
- Set Background Image by tapping the grey arrow icon. Once an image has been uploaded, a preview of it will appear. This image will show up as the background of the Check-In screen.
- Set Background, Theme, and Button Text color.
- Set Welcome Text. This will greet your guests as they use the app to check-in.
Check-in
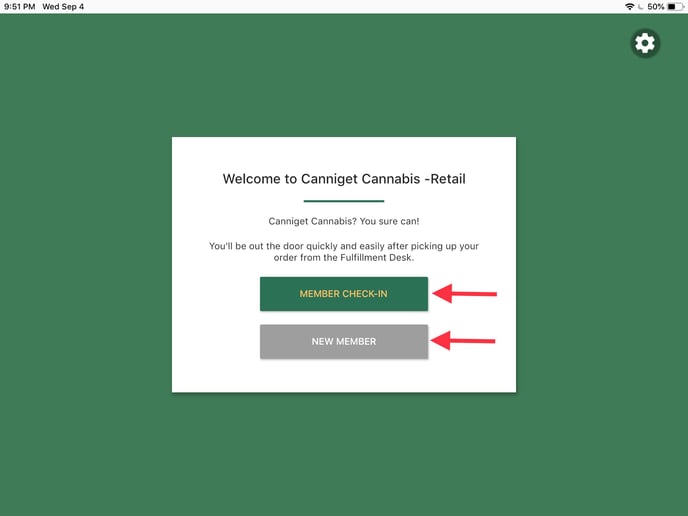
Check-ins can be processed either by looking up an existing member or by signing up a new member.
Existing Member
1. Tap on the "Member Check-in" button.
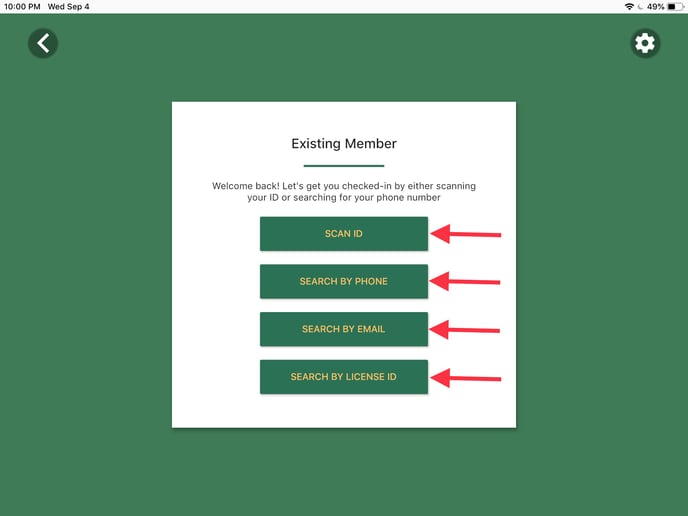
2. Select which method to check in the Existing member (Scan ID, Phone, Email, or License ID).
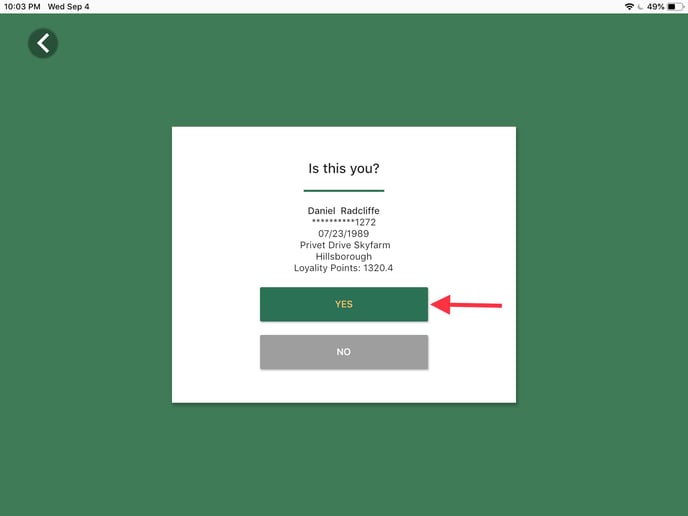
3. Confirm the member profile by tapping the "Yes" button.
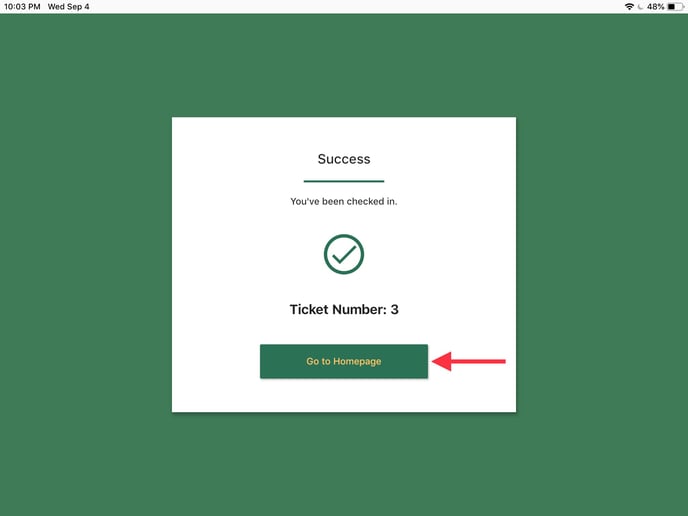
4. Tap the "Check-in" button to check-in.

5. A Ticket Number will be assigned to you. Tap the "Go to Homepage" button to return to the homepage.
New Member
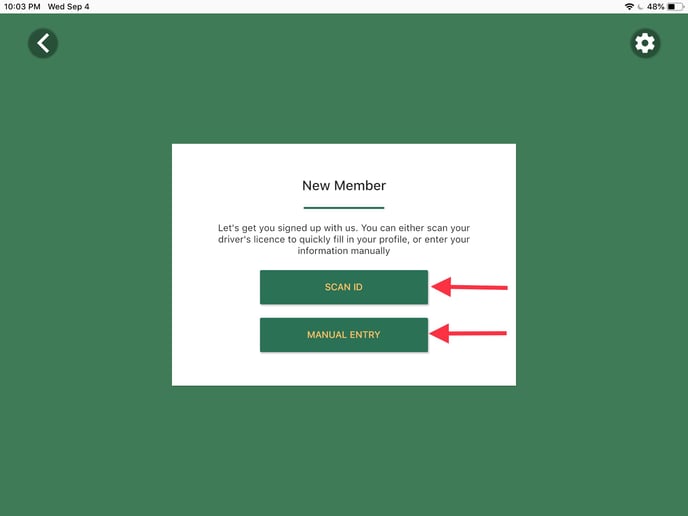
1. Tap the "New Member" button.

2. Select which method to sign up the new member (Scan ID or Manual Entry).
3. If "Scan ID" was selected, _____.
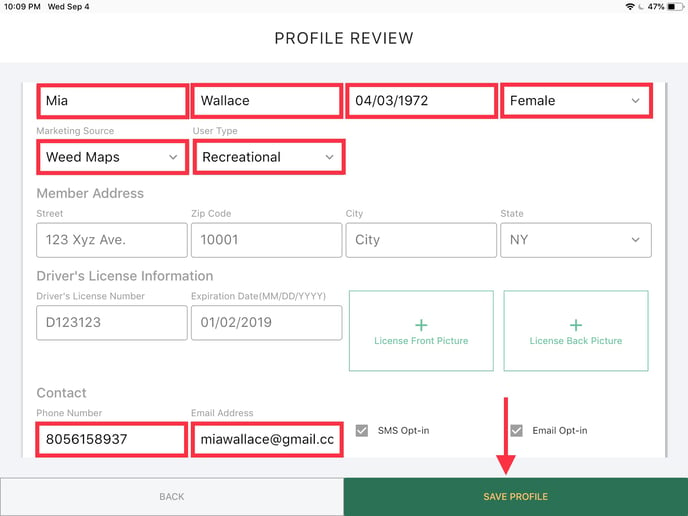
If "Manual Entry" was selected, you will be prompted to fill out the following information boxed in red: First and Last Name, Date of Birth, Gender, Marketing Source, User Type, Phone Number, and Email Address.
Review the new member's profile to ensure the information has been entered correctly. Tap the "Save Profile" button on the bottom left-hand side.
NOTE: Members created through the Check-In App will have loyalty disabled by default and can be enabled through the member's profile.
4. Tap the "Check-in" button to check-in. A Ticket Number will be assigned to you. Tap the "Go to Homepage" button to return to the homepage.

Queue
The Queue is where orders are managed and processed. Use the tabs on the left to navigate between the different queues available.
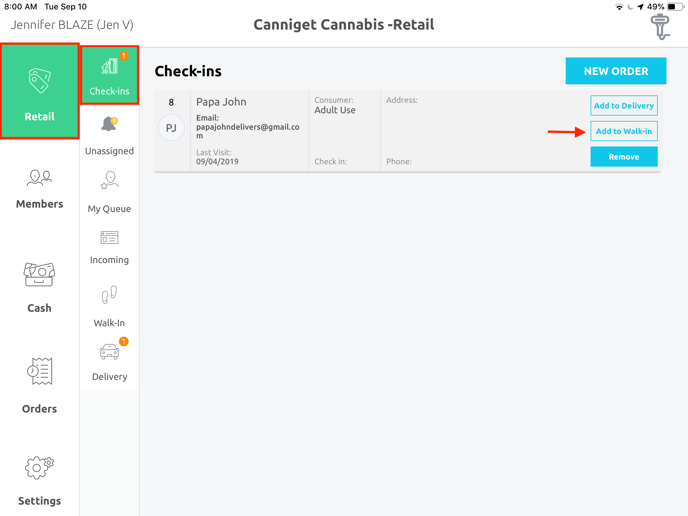
1. Navigate to the "Retail" section on the left-hand side. Then, click the "Check-ins" tab to view check-ins from the BLAZE Check-In app.
2. Click the "Add to Walk-in" button on the members you wish to check-in. Click the "Remove" button to remove a checked-in member.
NOTE: Their Ticket Number is displayed on the left-hand side, this number changes once they have been taken out of the Check-In Queue.
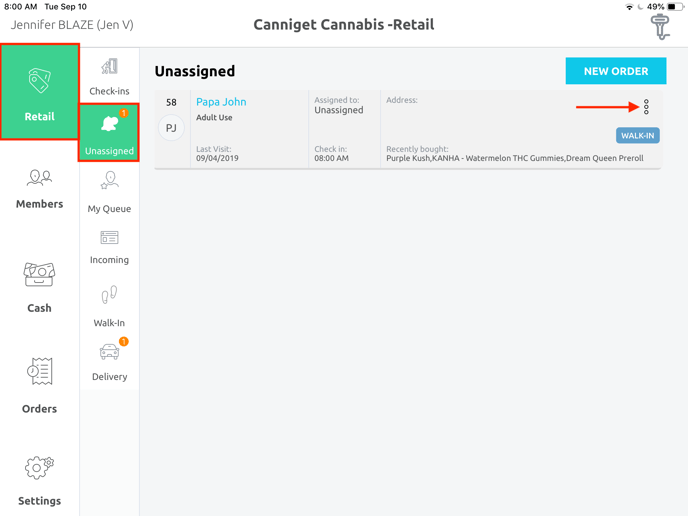
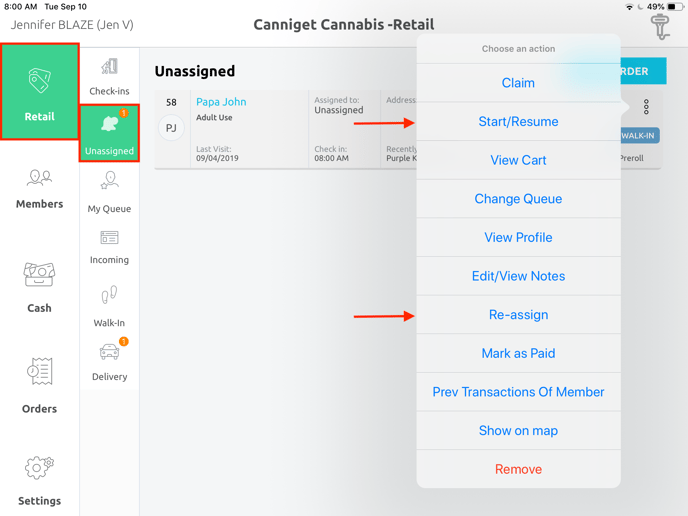
3. Once Members have been added to the Walkin Queue, they will appear in the Unassigned tab. Navigate to the "Unassigned" tab, to view the Unassigned Member(s).
Tap on the 3 dots of the order you wish to address. A variety of options will appear.
- Claim: This action assigns the member to you
- Start/Resume: This action either starts or resumes their order
- View Cart: This action displays a quick view of the items in their cart
- Change Queue: This action allows you to change the Queue they are in (Unassigned, Walkin, or Delivery)
- View Profile: This action allows you to view the Member's profile
- Edit/View Notes: This action allows you to edit and/or view previous Notes
- Re-Assign: This action allows you to re-assign this Member to another employee
- Mark as Paid: This action removes the payment process from the checking out experience
- Prev Transactions of Member: This action allows you to view this Member's previous transactions
- Show on Map: This action allows you to see their delivery address on Apple Maps
4. Tap either "Start/Resume" to continue processing the order, or "Re-assign" to assign the member to a different employee.
5. To learn more about processing an order, read our article here.