
BLAZE Insights Standard puts powerful reporting and analytics in one easy-to-use dashboard at no additional cost to BLAZE users.
Cannabis retailers can weaponize their data to give them a competitive edge with the ability to drill down into reports and make data-driven decisions. Follow this link for more information.
- Identify Products that Drive Revenue
- Gain Insight About Your Customers
- Understand Sales Trends and Optimize Inventory
- Intuitive Dashboard with Convenient Automated Reports
- Monitor Staff Activity and Productivity
- Single Source of Truth for Your Operation
Click here to see Insights Standard in action.
Click here to see Insights Advanced in action.
Click here to schedule a Demo of Insights
NOTE: Reference this link for common definitions and calculations.
Overview
- Retail Insights App | What's New? Definitions and Calculations that changed.
- Retail Insights App | Insights FAQ's
- Role Permissions
- Employee Shop Access
- Accessing Insights
- Insights Default Dashboard
- Insights Filters
- Dashboard Reports
- Report Scheduling & Sharing
- Alert Based Report Scheduling & Sharing
NOTE: Insights reports will be about 15 minutes behind live data.
Role Permissions
Global Settings > Company Settings > Roles and Permissions
- Click on the Web tab. Insights is only available in the Web
- Select the Role that you would like to give access to Insights
- Click on the Edit button
- Scroll down to the Insights Box
- Enable the permission you would like
- Each permission has access to the different types of reports, thereby protecting your sensitive information and controlling who has access
NOTE: Only one permission can be selected at a time.

- For more information on Roles and Permissions, click here
Employee Shop Access
NOTE: ALL employees, even Admins, must have the shops assigned for Insights access.
- Global Settings > Manage Employees > All Employees
- Select the employee that you need to assign to shops for Insights access
- Click the View button
- Click the Edit Button
- Scroll down to Assigned Shops
- Enable the shops that the employee should have access to in Insights
- Click the Update button at the top of the view
NOTE: It will take about 10 mins for these changes to take effect in Insights.
Accessing Insights
There are 2 ways to access Insights Standard.
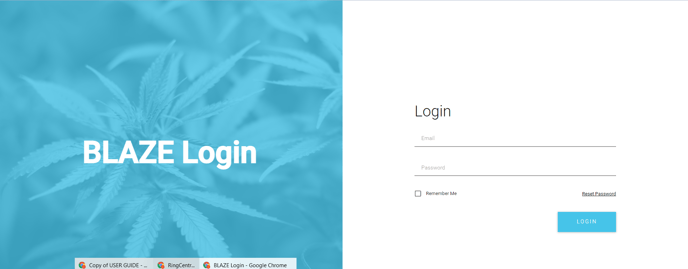
1. Go to the Login Page and enter your credentials
- Scroll down to Company-Wide Apps and click on the Insights Icon
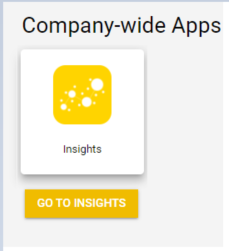
- Insights will open in a new tab
2. In the Retail Web, navigate to BLAZE Insights on the left-hand side menu, or on the Home Screen.
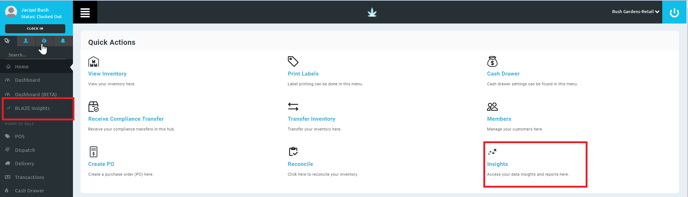
- Insights will open in a new tab
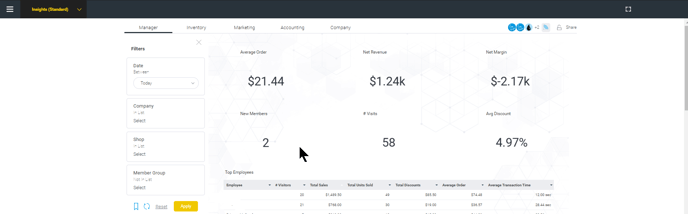
Insights Default Dashboard
- This is the default dashboard that will come up when you first go into Insights
- Scroll down to see all of the reports that are available.
NOTE: If your dashboard does not contain any information. Set the Company and / or Shop and click the APPLY button. This will only happen the first time you open Insights.
Filters
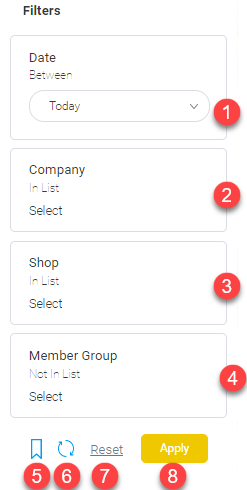
1. Date: Select the preset date ranges below or choose custom and enter your own date range
-
- Today
- Yesterday
- This Week
- This Month to Date
- This Month
- This Quarter
- This Quarter to Date
- This Quarter Last Year
- This Year to Date
- This Year
- Last 7 Days
- Last Month
- Last 4 Weeks
- Last 3 Months
- Last Quarter
- Custom
2. Company: Select the companies that you have permissions for and want to include in the report.
-
- You can search for a company name
- You can select all of the companies
- You can sort the list by the arrow for ascending or descending
- Check the box of the companies to include
- Click on the Apply button to save your selection(s)
3. Shop: Select the shop(s) that you would like to include in your report.
-
- You can search for a shop name
- You can select all of the shops
- You can sort the list by the arrow for ascending or descending
- Check the box of the shops to include
- Click on the Apply button to save your selection(s)
NOTE: You must have access to a shop for it to show in the list
4. Member Group: Select the member groups that you would like to filter your report on.
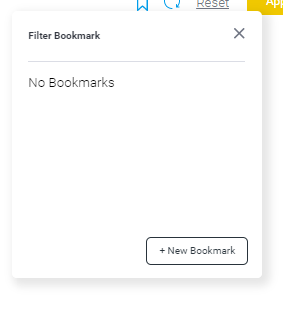
5. Filter Bookmark: Bookmark these selected filters. It will also list your saved bookmarks

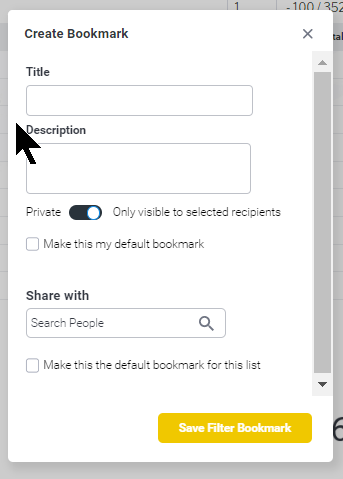
- +New Bookmark: create a new Bookmark for the filters selected
- Title: what is the name of this Filter Bookmark
- Description: description of this Filter Bookmark
- Private: enabled = only visible to selected recipients
- Make this my default bookmark: default Filter Bookmark
- Share with: select the people that you would like to share this Filter Bookmark with
- Make this the default bookmark for this list: default Filter Bookmark for this list of people
- Save Filter Bookmark: saves this Filter Bookmark and adds it to the Filter Bookmark list
5. Refresh: Refresh the current filters
6. Reset: Clear all of the filters and resets them to default filters
7. Apply: Apply all of the filters that you have selected for the current dashboard.
NOTE: You must click on the APPLY button after changing the filters. The filters will not auto-apply.
Dashboard Reports
Hover over a report to bring up additional options and information
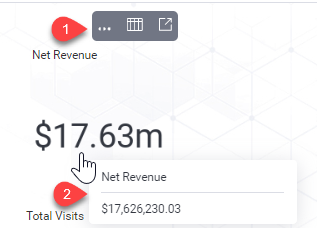
1. Three options are available for this report
- 3 Dots:
- Export: export the file in csv, text or print
- Share: several ways to share this report with others
- Email: this allows you to send the report to another user in email
- Embed: this provides you with the code to embed in HTML
- Link: this provides you with a link to this report
- Information: report details
- Table / Chart view: you can toggle between the two views
- Open Report: this will open the report in full screen so that you can see the detail
2. Displays the exact number for the report that is shown if it is a rounded value.
- Summary Dashboard
- Average Order
- Net Revenue
- Net Margin
- New members
- # Visits
- Average Discount
- Net Revenue Time Series
- Net Revenue by Queue Type
- Net Revenue by Payment Type
- Manager Dashboard
- Top Employees by Creation
- Net Revenue Heat Grid
- Net Margin by Product
- Net Revenue by Order Source
- Net Revenue by Payment Type
- Net Revenue by Cannabis Type
- Average Transaction Times by Queue
- Inventory Dashboard
- Top Brands
- Top Categories
- Top Products
- Inventory Snapshot Value / Quantity by Date
- Product Analysis by Price
- Inventory Aging Drilldown (Age > Category > Brand > Product)
- Low Inventory Snapshot Top 10 Dates
- Expired / Expiring Products Less than 90 Days Left
- Sales by Inventory Location
- Marketing Dashboard
- Top 10 - Net Revenue by Promotion
- Net Revenue by Member Group
- New Members - One Time vs Returning Customers
- Revenue by Marketing Source
- Member Age Analysis
- Accounting Dashboard
- Summary Breakout
- Inventory Value of Yesterday
- Inventory Value of End of Last Month
- Total Due by Payment Type
- Cannabis / Non-Cannabis Tax Breakdown
- Accounting - Cannabis / Non-Cannabis w / Consumer Type Tax Breakdown
- Cannabis Sales by Category
- Company Dashboard
- Net Revenue Time Series
- Shop Comparison
- Category Analysis by Shop
Report Scheduling & Sharing
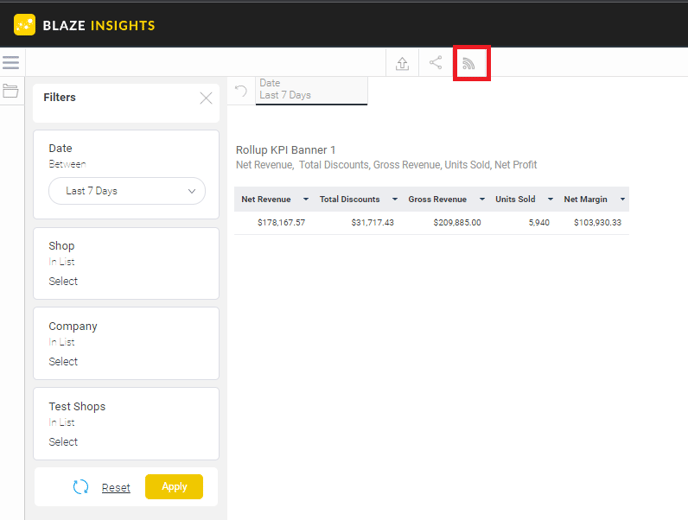
You can schedule and share the Dashboard that you are viewing by clicking on the Broadcast icon.

- Click on the Create New Button in the pop-up window
- Select Broadcast or Personal Broadcast and complete the form
- Broadcast: send to a group of people
- Recipients: email addresses
- Email Subject: a subject for the email
- Email body: personalize the message for this dashboard
- Append Broadcast Date: add the broadcast date to the email
- Secure PDF: send this as a secure PDF
- User Prompt Filters: Current or Default
- Frequency: select the frequency and what day of the week
- Advanced Settings
- Set the time for the dashboard to run
- Limit Schedule Period: if enabled, you can restrict when this dashboard / report is broadcast. For example, only send this dashboard out for the month of April.
- Failure Notification: enabled or disabled. If enabled, enter the assignee to send the failure notification to.
- Click on Submit to save and schedule.
- Broadcast: send to a group of people
-
- Personal Broadcast: send to yourself
- Email Subject: a subject for the email
- Email body: personalize the message for this dashboard
- Append Broadcast Date: add the broadcast date to the email
- Secure PDF: send this as a secure PDF
- User Prompt Filters: Current or Default
- Frequency: select the frequency and what day of the week
- Advanced Settings
- Set the time for the dashboard to run
- Limit Schedule Period: if enabled, you can restrict when this dashboard / report is broadcast. For example, only send this dashboard out for the month of April.
- Failure Notification: enabled or disabled. If enabled, enter the assignee to send the failure notification to.
- Click on Save Subscription to save and schedule.
- Personal Broadcast: send to yourself
Alert Based Report Scheduling & Sharing
You can schedule a broadcast based on an alert for a report when you are in the full screen view.
- Hover over a report and click on the Open Report icon.

- Click on the Broadcast icon.
- Select Broadcast or Personal Broadcast and complete the form
- Broadcast: send to a group of people
- Recipients: email addresses
- Email Subject: a subject for the email
- Email body: personalize the message for this dashboard
- Append Broadcast Date: add the broadcast date to the email
- Secure PDF: send this as a secure PDF
- User Prompt Filters: Current or Default
- Continuous Schedule: report will be delivered based on the selected schedule
- Continuous: will always be sent based on the information selected
- Alert: will only be sent out when the Alert Delivery Rules apply
- Frequency: select the frequency and what day of the week
- Advanced Settings
- Set the time for the report to run
- Limit Schedule Period: if enabled, you can restrict when this dashboard / report is broadcast. For example, only send this dashboard out for the month of April.
- Failure Notification: enabled or disabled. If enabled, enter the assignee to send the failure notification to.
- Click on Submit to save and schedule.
- Broadcast: send to a group of people
-
- Personal Broadcast: send to yourself
- Email Subject: a subject for the email
- Email body: personalize the message for this dashboard
- Append Broadcast Date: add the broadcast date to the email
- Secure PDF: send this as a secure PDF
- User Prompt Filters: Current or Default
- Continuous Schedule: the report will be delivered based on the selected schedule
- Continuous: will always be sent based on the information selected
- Alert: will only be sent out when the Alert Delivery Rules apply
- Frequency: select the frequency and what day of the week
- Personal Broadcast: send to yourself
-
-
- Advanced Settings
- Set the time for the report to run
- Limit Schedule Period: if enabled, you can restrict when this dashboard / report is broadcast. For example, only send this dashboard out for the month of April.
- Failure Notification: enabled or disabled. If enabled, enter the assignee to send the failure notification to.
- Click on Save Subscription to save and schedule.
- Advanced Settings
-
- Select Smart Task
- Title: title of the task
- Requestor: who requested this task
- Task Description: description of this task
- Assignee: who is this task assigned to
- Priority: low, medium, high
- Subscribers: email addresses of those that want this alert
- User Prompt Filters: current or default
- Alert-based broadcast: this task is an alert-based broadcast
- Frequency: select the frequency and what day of the week
- Advanced Settings
- Set the time for the dashboard to run
- Limit Schedule Period: if enabled, you can restrict when this dashboard / report is broadcast. For example, only send this dashboard out for the month of April.
- Failure Notification: enabled or disabled. If enabled, enter the assignee to send the failure notification to.
- Add Alert Delivery Rules
- Alert Data: select which action will cause the alert
- One or more rows must match
- Aggregate against entire result set
- Delivery Rule: select the first field
- Click Add Field and complete the delivery rule
- Click Submit
- Alert Data: select which action will cause the alert
If you have further questions, please reach out to us at support@blaze.me !