Retail | Purchase Order (PO) Overview
This overview will guide you through the different parts of BLAZE's Purchase Order system.
There are 5 main parts to our PO system:
To see a step by step guide with illustrations, click on the blue links below.
To see a step by step guide with illustrations, click on the blue links below.
1. Creating a PO
BLAZE's PO system allows you to make Purchase Orders to send to your Vendors. This can be done by Creating a PO. The created PO can be emailed directly to your vendor.
2. Receiving a PO
Once your PO has been shipped and received from the Vendor, you can move on to Receiving a PO:
- The inventory received is then transferred to your inventory.
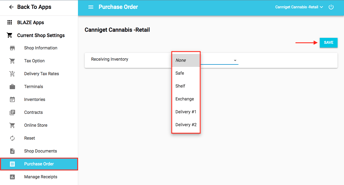
- The inventory collected from a PO by default goes to the Safe Inventory. However, this can be modified in Global Settings > Current Shop Settings > Purchase Order.
- Your Inventories will be listed in a dropdown menu.
- Click the blue Save button.

3. PO Billing
To keep track of payments made on the purchase order, use our PO Billing. Payments can be made in full or in installments with various payment types (ACH Transfer, Credit, Cash, Check, Debit, or Other).
4. Completing a PO
Once a PO Bill has been fully paid, it will appear in the Completed POs tab. Purchase Orders that have been moved to the Completed section cannot be modified.