Overview
Metrc regulations require that delivery-specific information be entered into CCTT beginning no later than April 1, 2023. Below is an outline of the steps to take in Blaze to have the delivery ledger created for you with each delivery.
NOTE: This option is only available for shops in the state of California
Operating a Delivery Service
- Prerequisites
- Steps to Process Delivery Orders
- Re-Assign a Driver
- Create Transfer
- Reconciliations
- Understanding the Cash Drawer
- FAQ's
Prerequisites
1. Create an inventory for each driver.
- Create an inventory for each delivery driver/vehicle if one does not exist. The inventory valuation is pulled from the inventory assigned to the driver. This valuation displays on the Delivery Ledger.
- Global Settings > Current Shop Settings > Inventories
- Instructions on how to create an inventory
2. Create a terminal for each driver.
- Create a terminal for each driver. This will work with the Cash Drawer that must be started on each driver's shift.
- Global Settings > Current Shop Settings >Terminals
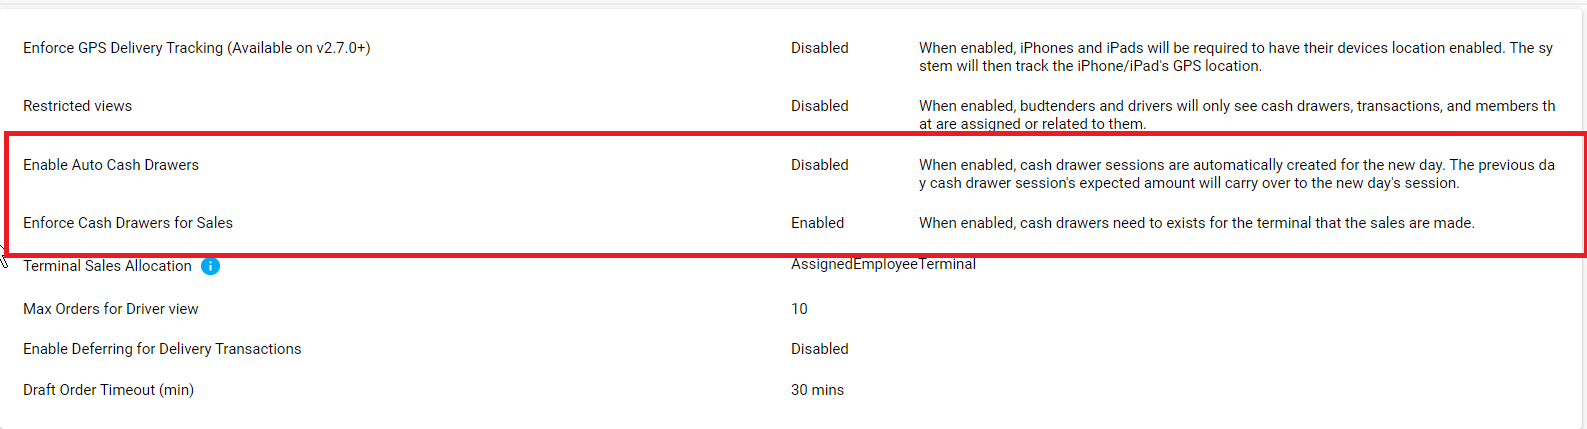
3. Disable Auto Cash Drawer
- The delivery drivers' cash drawer should not be started until they are ready to leave to make deliveries.
- Global Settings > Current Shop Settings > Shop Information
(All vehicle info details need to be added )
-
- Company Settings > Vehicles
- Required fields are: Vehicle Make, Vehicle Model, License Plate
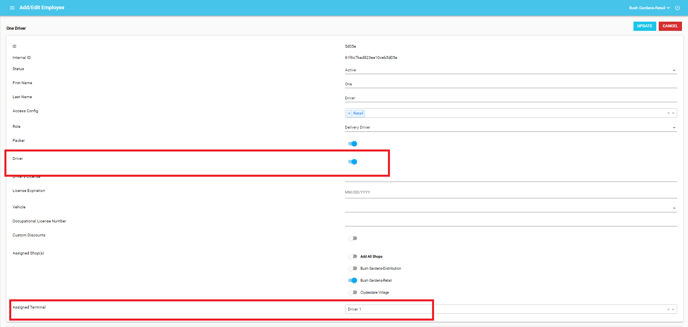
5. Verify the Driver employee profile.
- Global Settings > Manage Employees > All Employees
- Required Fields: Driver name, Driver's Lic. No., Driver's Phone number
- Make sure that the Driver option is enabled
- Make sure the terminal for the driver is listed in the employee profile
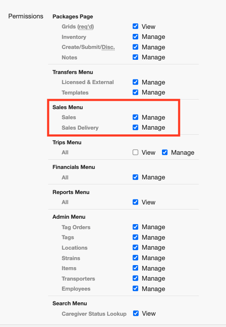
6. Verify the Roles & Permissions for Inventory Transfers for all roles.
- To accept the transfer, the permission "Inventory transfer in web" must be enabled in the Roles & Permissions section with Global Settings.
7. Refresh your Metrc Permissions and API Key.
- Update by enabling the Admin's new permission settings. If Metrc employees are enabled, each employee's permissions and API key need to be updated.
- Once you have updated permissions in Metrc you will want to generate a new metrc API key and update it in Blaze. Follow the steps in this support article if you need assistance in creating a new API key.
8. Definitions:
- Planned Delivery - Pizza Style delivery
- Unplanned Delivery - Ice Cream Truck Style delivery
9. Deliveries for the next day or a future date
- Do not Assign future deliveries to a driver until the day of delivery. The delivery ledger only contains information for that day's deliveries. Either leave these future orders in Unassigned or create a fictitious driver to whom you can assign them until the delivery date.
Daily Steps to Process Delivery Orders
These steps have been created so that you can update your workflow processes. There are points in the process where information is digitally sent to Metrc concerning the deliveries, inventory quantity, valuation and driver location.
**** No Partial orders for Transfers. All orders must either be 100% fulfilled or not fulfilled at all.
Pizza Style Delivery - Planned Deliveries
1. Assign orders to the drivers
2. Create Inventory Transfers for the Driver's inventory.
- Before the trip is started, you may perform a Submit and Accept when using the Inventory Transfer V1 or V2 for the inventory transfers.
- However, after the trip has been started, you should only submit the transfer through the Assign Driver option. The driver will need to accept the inventory transfer, but only when the trip has been stopped.
- How to accept an inventory transfer in the Delivery App, see the Incoming section.
3. Start the driver's Cash Drawer. It is again very important that the cash drawer is not started until the driver is ready to leave to begin the deliveries.
- How to open a Cash Drawer in the Delivery App , see the Cash Drawer section.
4. Proceed with deliveries as normal.
5. Assign an order to a Pizza Style Delivery Driver , use the inventory transfer on the Assign Driver popup to transfer inventory.
- The Driver needs to be at the shop with the trip stopped when they accept the transfer. This way, the Delivery Ledger will only reflect what is physically in the vehicle. Accepting a transfer before the product is physically in the vehicle will show that inventory on the ledger and the ledger would be incorrect if a driver were stopped for inspection.
- How to accept an inventory transfer in the Delivery App, see the Incoming section.
6. The driver must close their Cash Drawer at the shift's end and make sure their trip is stopped.
- How to close a Cash Drawer in the Delivery App, see the Cash Drawer section.
Ice Cream Truck Style Delivery - Unplanned Deliveries
1. Assign orders to the drivers
2. Create Inventory Transfers for the Driver's inventory.
- Remember the $10,000 retail value limit.
- Before the Cash Drawer is started, you may perform a Submit and Accept when using the Inventory Transfer V1 or V2 for the inventory transfers.
- However, after the Cash Drawer has been started, you should only submit (not submit and accept) the V1 or V2 transfer. You can also use the Create Transfer option for the order if it is just the order that needs to be transferred. The driver will need to accept the inventory transfer, but only when they are physically located at the shop and the trip is stopped.
- How to accept an inventory transfer in the Delivery App, see the Incoming section.
3. Start the driver's Cash Drawer. It is again very important that the cash drawer is not started until the driver is ready to leave to begin the deliveries.
- How to open a Cash Drawer in the Delivery App , see the Cash Drawer section.
4. Proceed with deliveries as normal.
5. Assign an order to a Ice Cream Truck / Hybrid style delivery.
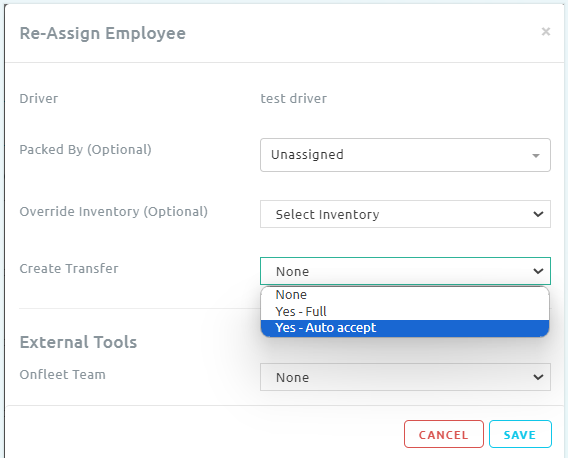
- None - select this if the driver already has the inventory
- Yes - Full - select this if the inventory needs to be transferred to the driver inventory. The driver will need to accept this inventory.
- Yes - Auto accept - select this if the trip has been stopped and you want the inventory to be automatically transferred without having to be accepted by the driver.
- If the Ice Cream Truck / Hybrid delivery style driver needs to replenish inventory, you can use the Create Transfer option. The driver will need to accept the incoming inventory when they are physically located at the shop and have the trip stopped.
- How to accept an inventory transfer in the Delivery App, see the Incoming section.
6. The driver must close their Cash Drawer at the shift's end and make sure the trip is stopped.
- How to close a Cash Drawer in the Delivery App, see the Cash Drawer section.
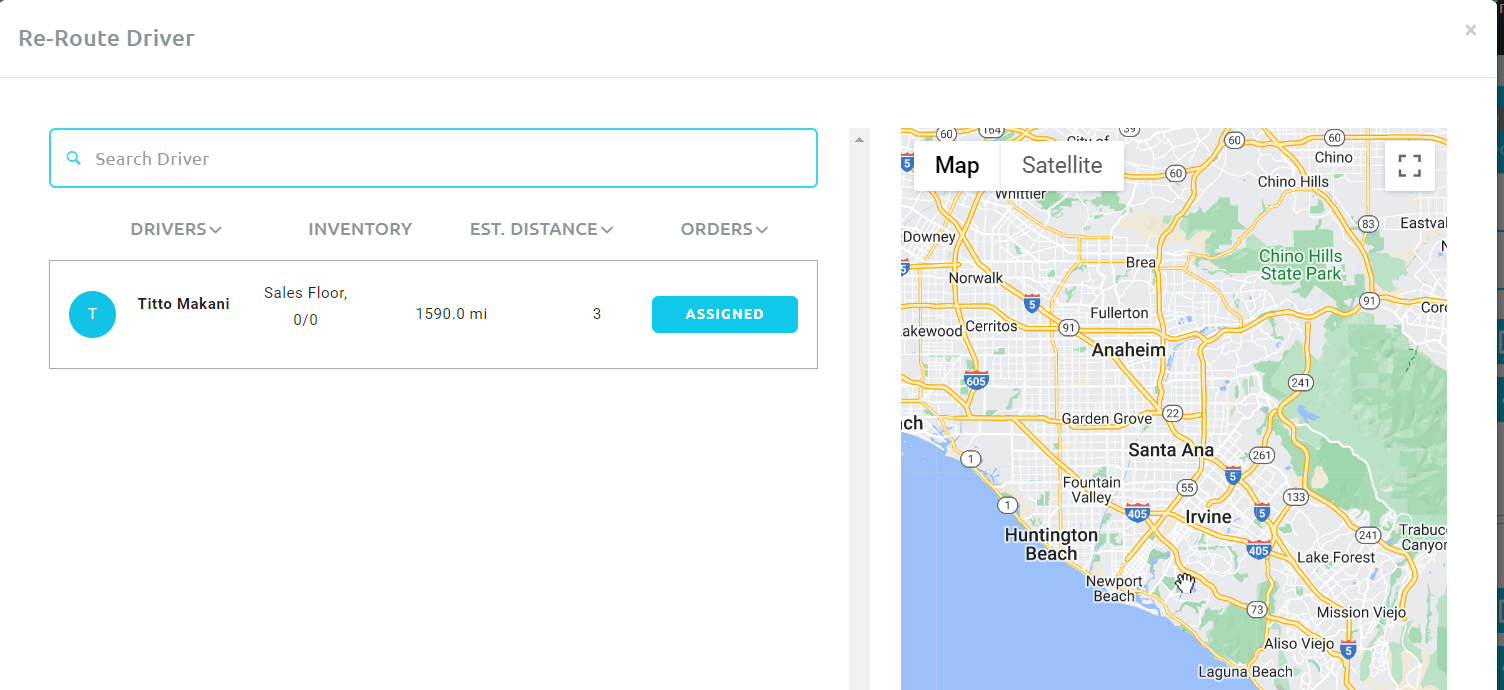
Re-Route / Reassign a Delivery Driver
1. Click on the Re-route box for the transaction
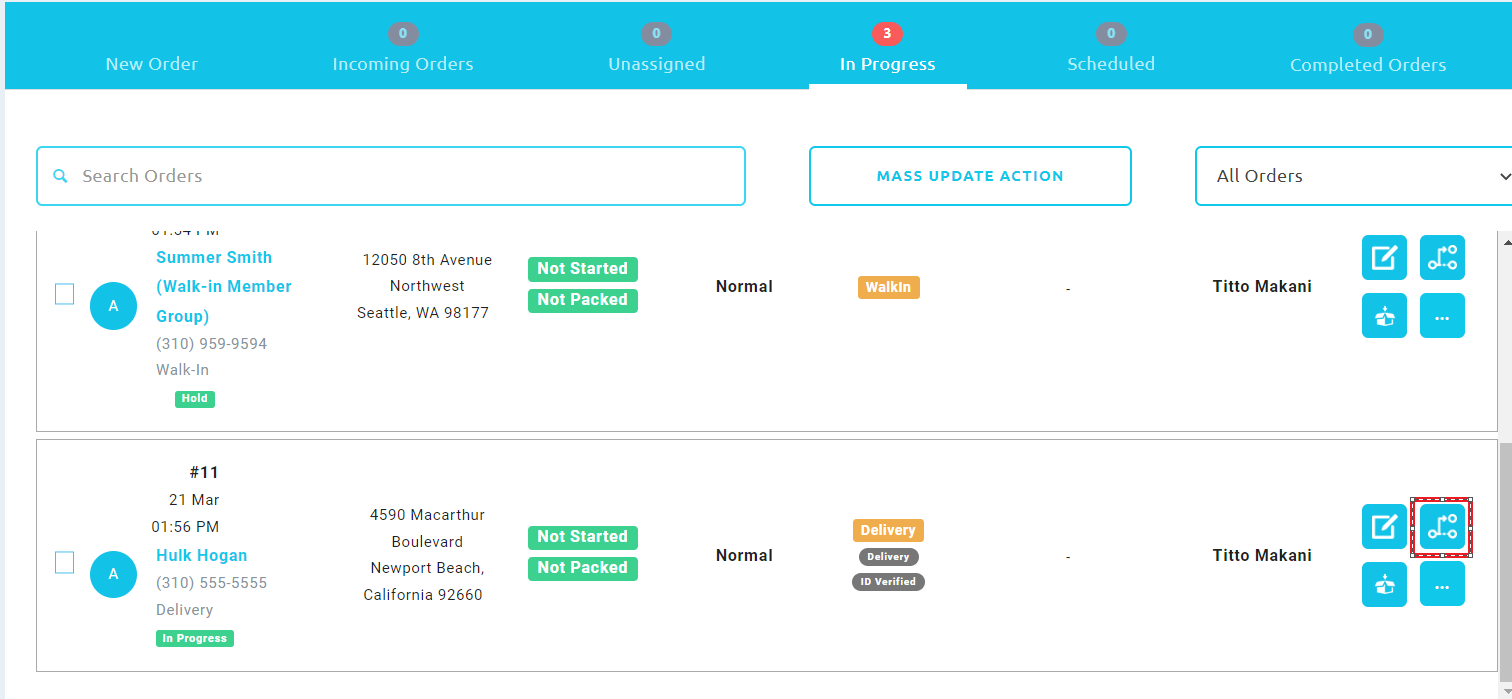
2. Select the driver that you would like to assign this order to
3. Select the type of transfer
- None - select this if the driver already has the inventory
- Yes - Full - select this if the inventory needs to be transferred to the driver inventory. The driver will need to accept this inventory.
- Yes - Auto accept - select this if the trip has been stopped and you want the inventory to be automatically transferred without having to be accepted by the driver.
4. Select the Inventory to transfer from in the drop down list
5. Click Save
Create A Transfer
1. Use this option if you need to replenish a driver's inventory for a delivery.
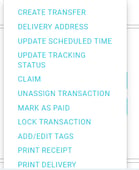
2. From the "In Progress" view, click on the 3 dots in the box for the transaction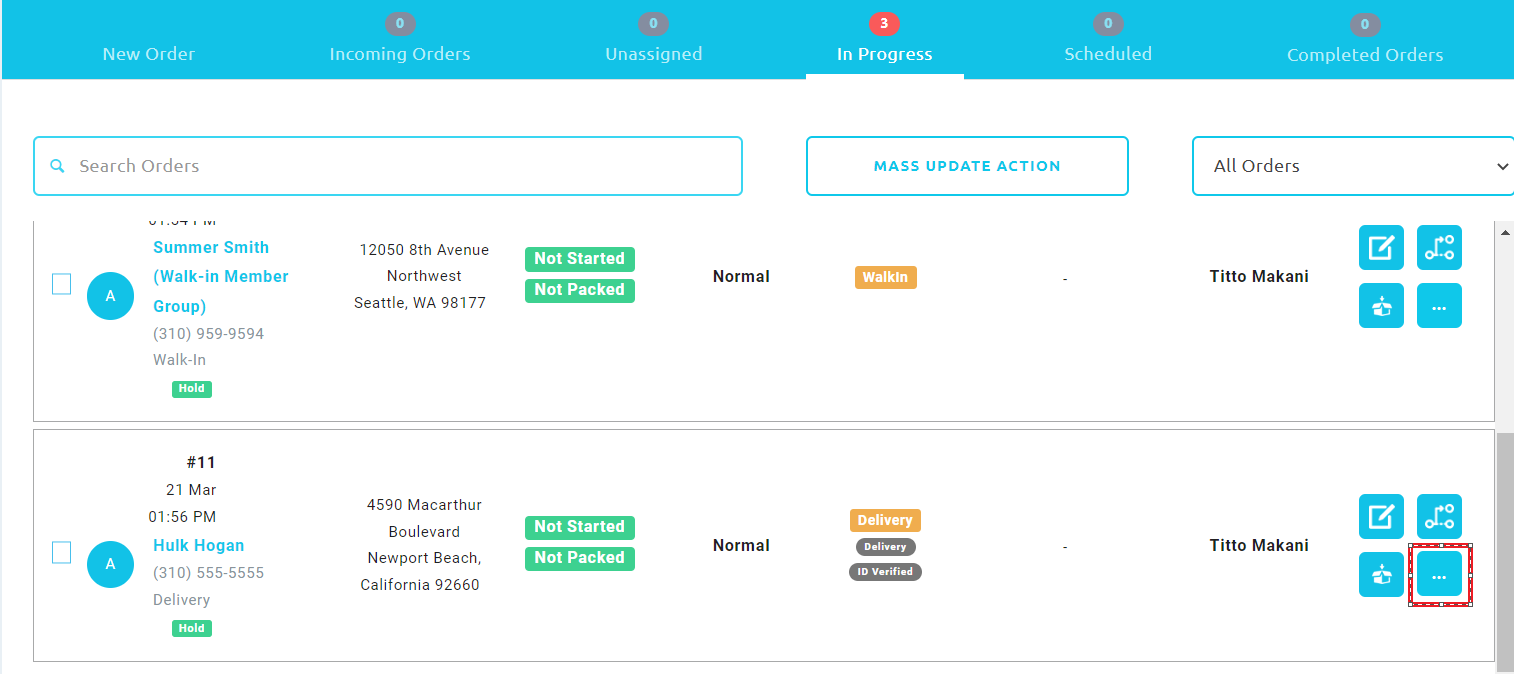 3. Select Create Transfer
4. Select Full or Partial
- Full: Transfer all of the products on the order to the drivers inventory. The driver will need to accept this inventory.
- Yes - Auto accept: this will automatically transfer the inventory to the drivers inventory if they have not started a trip or if they have stopped a trip. The driver will not need to accept the transfer.
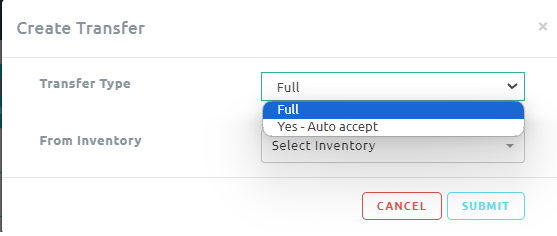
5. Select the Inventory to transfer from in the drop down list
6. Click Submit
Reconciliations
- Metrc locks the batch on a product if any quantity is on a delivery ledger.
- This means that reconciliations will fail.
- Best Practice to reconcile:
- Stop the trip for the driver who has the product
- Transfer those products that need to be reconciled back to the Safe or Store inventory.
- Reconcile the product
- Transfer product back to the inventory for the delivery ledger if needed
- Start the trip
Best recommended practice is to reconcile at the end of the day after the ledger is closed and the trip has been stopped.